A look at Microsoft Intune

Intune was born as Microsoft’s Cloud based Mobile Device Management platform. Since then, it has...

The growth of mobile devices, such as smartphones and tablets, changed the world rapidly. Today, according to the Cisco Visual Networking Index (VNI), there are almost as many mobile devices as humans on the planet: about 7 billion.
Mobile devices changed the way we live, work, gather information, and communicate together. Facebook has more than 150 million active users currently accessing its services through their mobile devices. Twitter users post 80% of tweets using their smartphones or tablets. Every company in the world uses mobile devices for their business.
Most notably, business users store very important information on their devices, such as emails, certificates, pictures, etc. Most of this stored information isn’t intended for the general public. Mobile device security and management is mandatory for every company and its users. As such, mobile device security and management should not be an afterthought.
On March 30, 2015, Microsoft made the built-in device management capabilities in Office 365 available to the public at no additional cost.. With MDM in Office 365, you can manage access to Office 365 data across a diverse range of phones and tablets, including Windows Phone, iOS, Android and PCs / Notebooks with Windows 8.1 devices. MDM in Office 365 leverages Microsoft Intune and Microsoft Azure Active Directory to deliver this capability.
There are three ways to keep your data safe, which should be already known by Exchange administrators:
If you and your company need more protection, you can subscribe to Microsoft Intune and receive additional device and application management capabilities.
This blog post shows how administrators can configure mobile devices with different configuration options in Office 365 with built-in MDM. The first step is to log on to your Office 365 subscription with your Global Administrator account to configure relevant MDM and compliance options for phones and tablets.
Currently, my Office 365 test tenant contains no configured mobile device, as displayed in Figure 1.
Note: Windows Phone and Android devices can be configured without an APNs certificate. iOS devices require an APNs certificate. APNs: (Apple Push Notifications) Certificate.
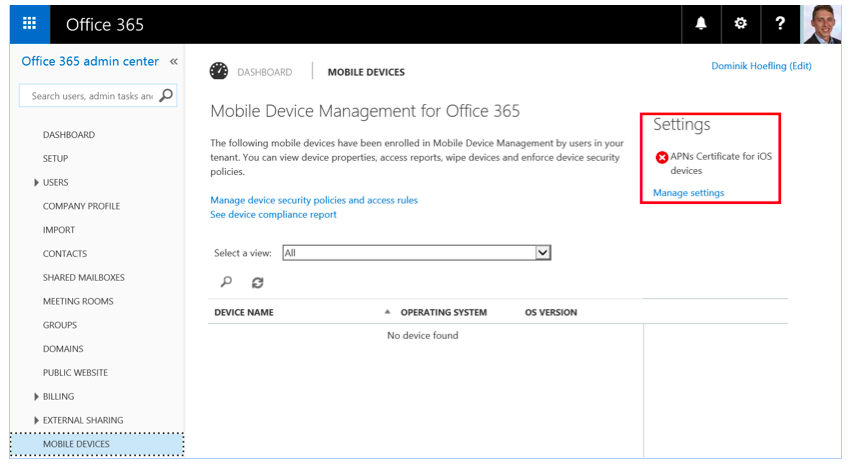
Figure 1: Office 365 Admin Center at https://portal.office.com / MOBLE DEVICES section
The very first step is to configure an Office 365 domain. Without a valid configured domain, you’re not able to configure MDM.
If you already configured a domain before the general availability of MDM, the second step is to configure the required CNAME records in your domains DNS settings for MDM in Office 365. These records are similar to your already existing autodiscover CNAME record for Exchange Online. Figure 2 shows an example configuration for an Office 365 Enterprise E1 plan.

Figure 2: Office 365 DNS configuration settings
Let’s go further with the configuration of an Apple iPhone 6 device with current iOS 8.4. As you can see above in Figure 1, we have to set up Apple Push Notifications (APNs) Certificate after your domain was successfully created and configured. Click on the link “Manage settings,” and a pop up appears as you can see in Figure 3.
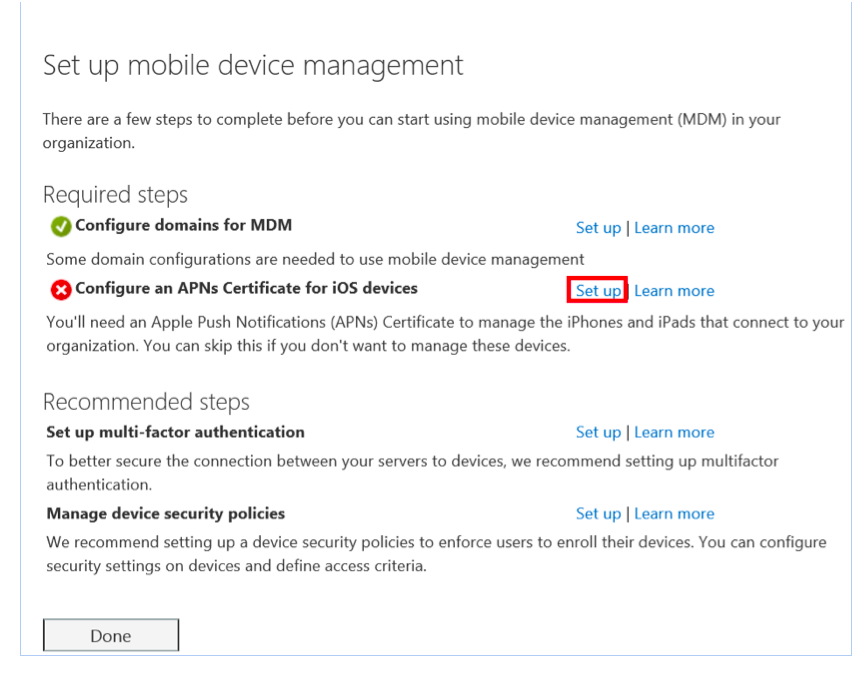
Figure 3: Set up mobile device management
Click on the link “Set up” at the APNs configuration. The website will redirect you to “Install Apple Push Notification Certificate” as you can see in Figure 4.
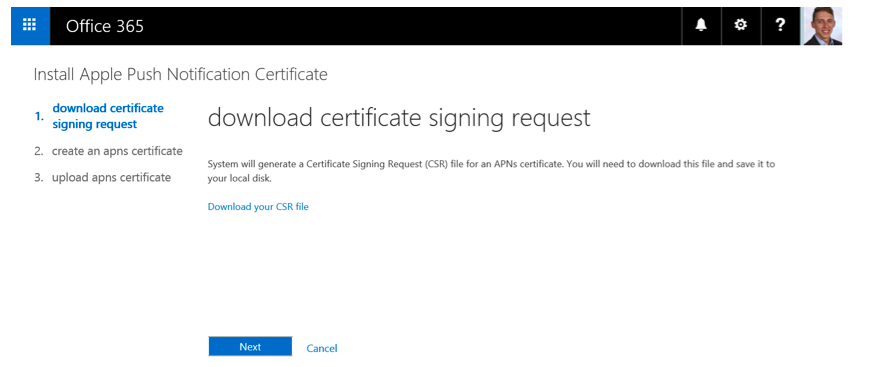
Figure 4: Install Apple Push Notification Certificate
Download the AppleCertRequest.csr file to your local disk, for example, C:\temp\AppleCertRequest.csr. Click on next.
Then, create an APNs certificate in the Apple push Certificates portal as shown in Figure 5.
Important: Use a company Apple ID that is associated with an email account that will remain in your company even if the user who creates the account leaves. 
Figure 5: Create an APNs Certificate
Sign in with your recently created or existing Apple ID in the Apple Push Certificates Portal as shown in Figure 6.
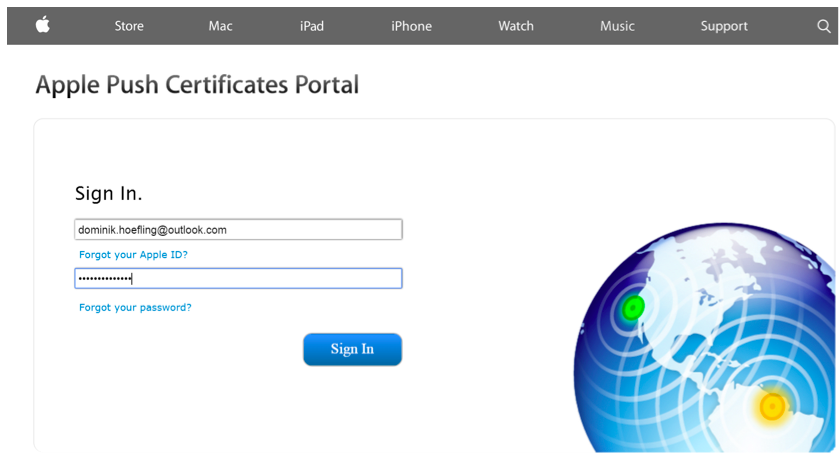
Figure 6: Apple Push Certificates Portal sign-in page
Create a push certificate that enables your third-party server (in this case Office 365) to work with the Apple Push Notification Service and your Apple devices. Figure 7 represents the certificate creation process.
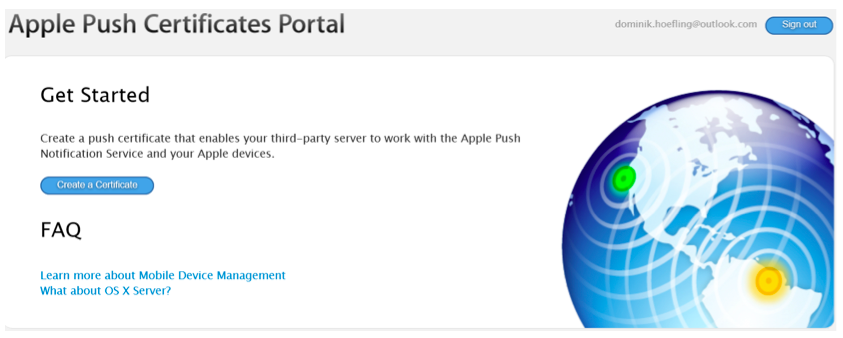
Figure 7: Apple Push Certificates Portal get started page
Click on “Create a Certificate,” and accept the terms and conditions.
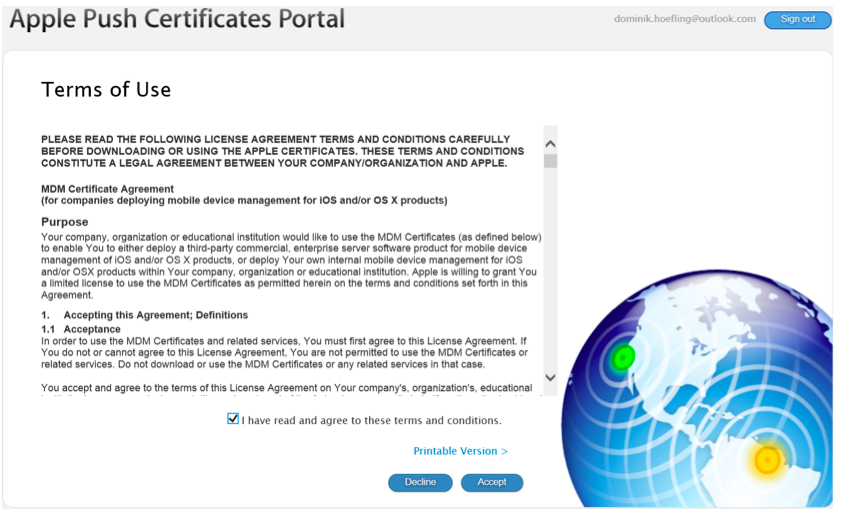
Figure 8: Apple Push Certificates Portal Terms of Use
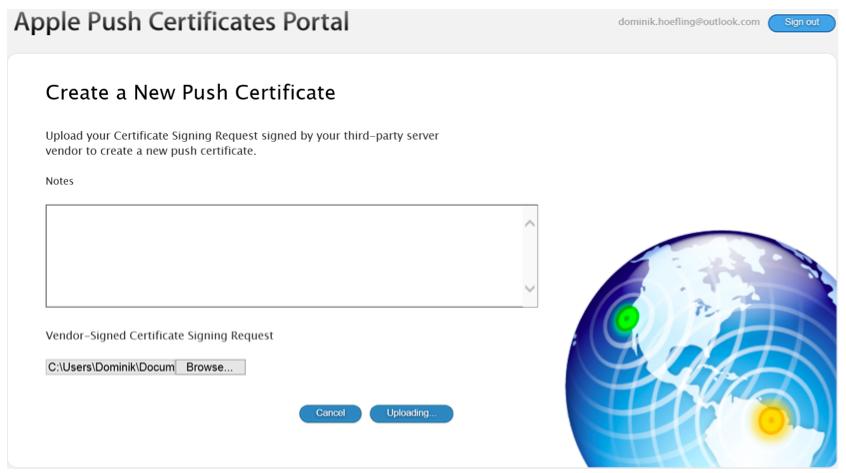
Figure 9: Apple Push Certificates Portal certificate creation
Browse to your local disk path where you saved the AppleCertRequest.csr file. The upload starts automatically.
Important: after creation, your IE Browser wants to download a file called createc2118ae6.json (or similar). This is not the correct .pem certificate file we need! Just refresh your browser, and you can see the correct page as shown in Figure 10.
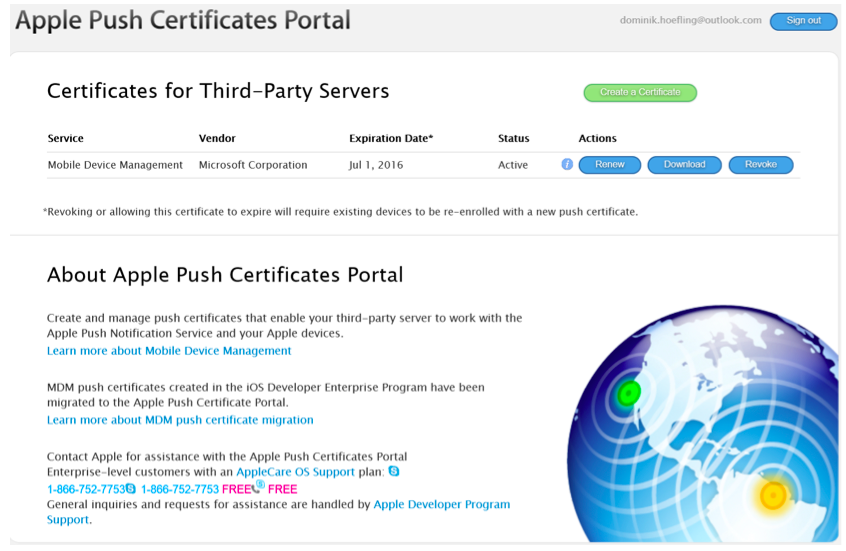
Figure 10: Apple Push Certificates Portal overview
Now you can download the .pem file “MDM_Microsoft Corporation_Certificate.pem and save it to your preferred local file path.
Note: After downloading the APNs Certficate, you receive an important email notification from Apple:
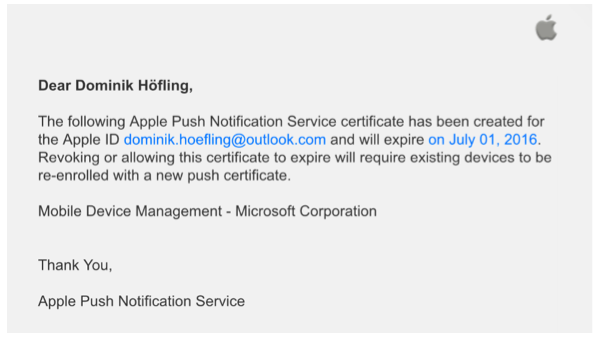
Figure 11: Apple Push Notification Service email notification
After you downloaded the (correct) push certificate, switch back to the Office 365 portal and click on “Next” as shown in Figure 5.
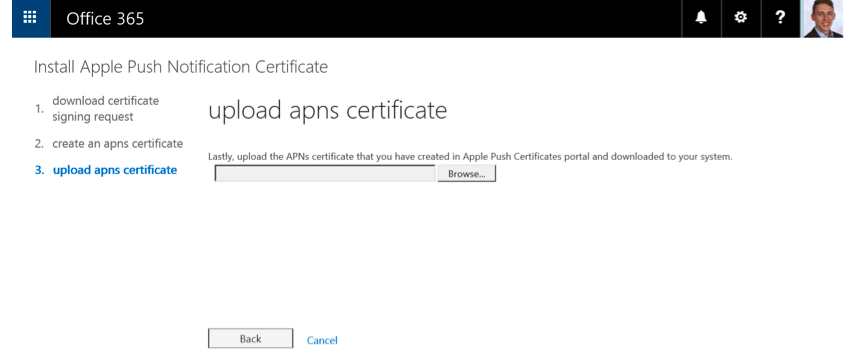
Figure 12: Install Apple Push Notification Certificate in Office 365
The last step before finishing the APNs setting is to upload your .pem certificate file and click on the button “Finish.” Figure 13 shows the successful certificate upload.
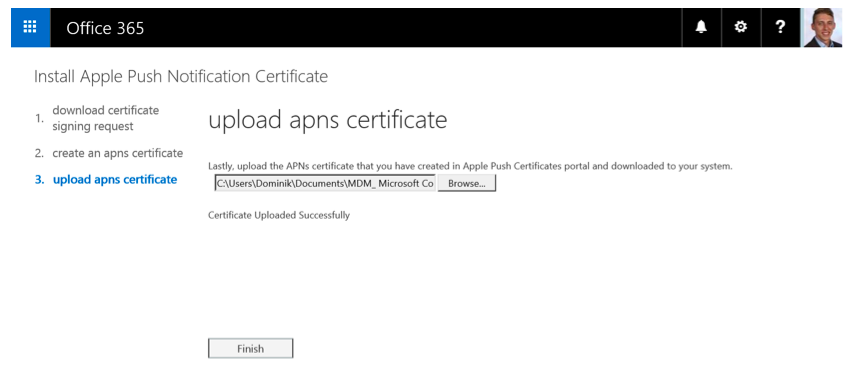
Figure 13: Install Apple Push Notification Certificate in Office 365
Return back to Figure, 1 and you can see that the APNs Certificate was installed successfully:

Figure 14: Successful configured APNS Certificate for iOS settings
The next steps are similar to every mobile device. Only Apple devices needs the APNs Certificate for iOS configuration.
You can manage device security policies and access rules in the Office 365 portal in the section “Mobile devices,” similar to Figure 1. You will be redirected to the Office 365 Compliance Center to manager your device access settings.
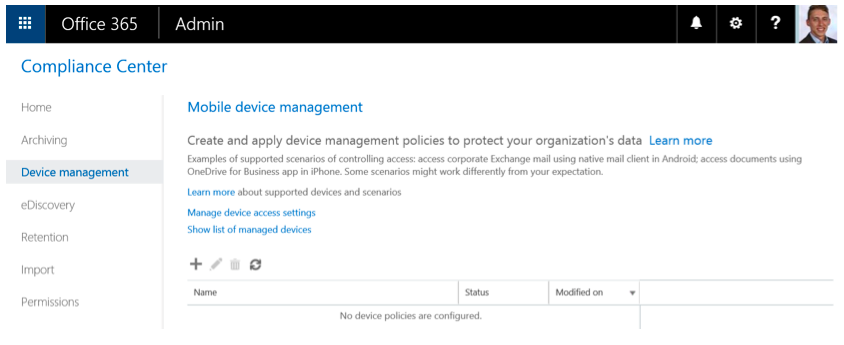
Figure 15: Office 365 Compliance Center – Device management
Click on “Manage device access settings” as shown in Figure 15, and choose if you want to allow or block access to Exchange email using native email clients when they are targeted by policies. You can also choose any security groups you want to exclude from the organizational-wide access control:
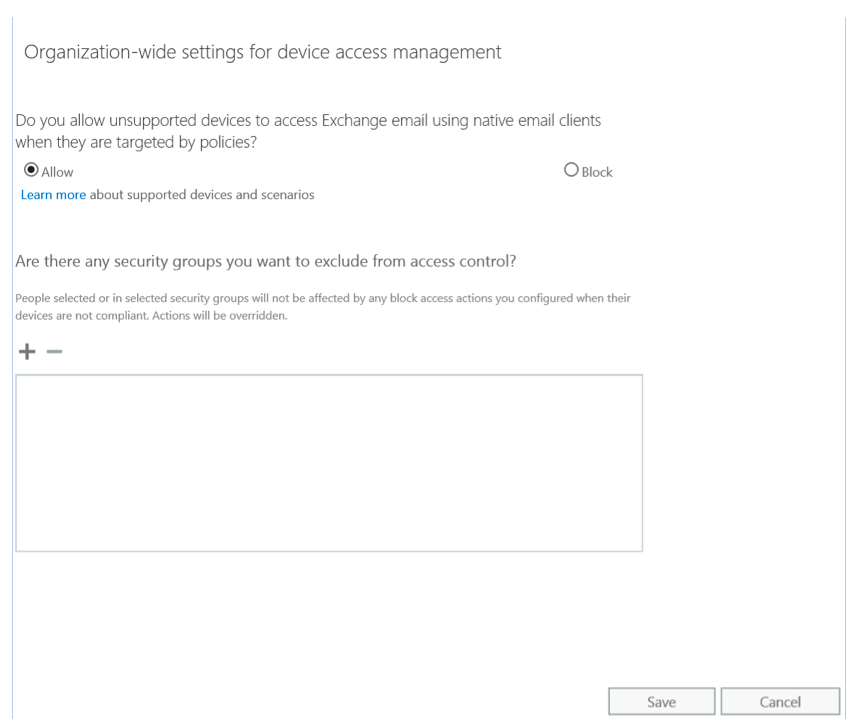
Figure 16: Organization-wide settings for device access management
Click save, and add a new device security policy on the new button as shown in Figure 15. A new window will turn up.
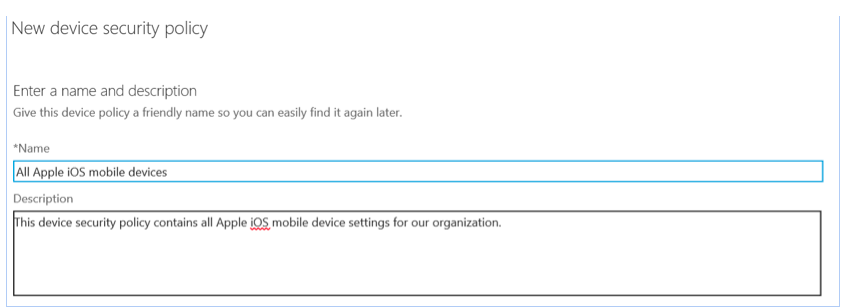
Figure 17: New device security policy
Enter the name and description of your new device security policy. For example, start with all Apple devices in your organization.
Next, configure your company requirements, which you want to have on all Apple devices:
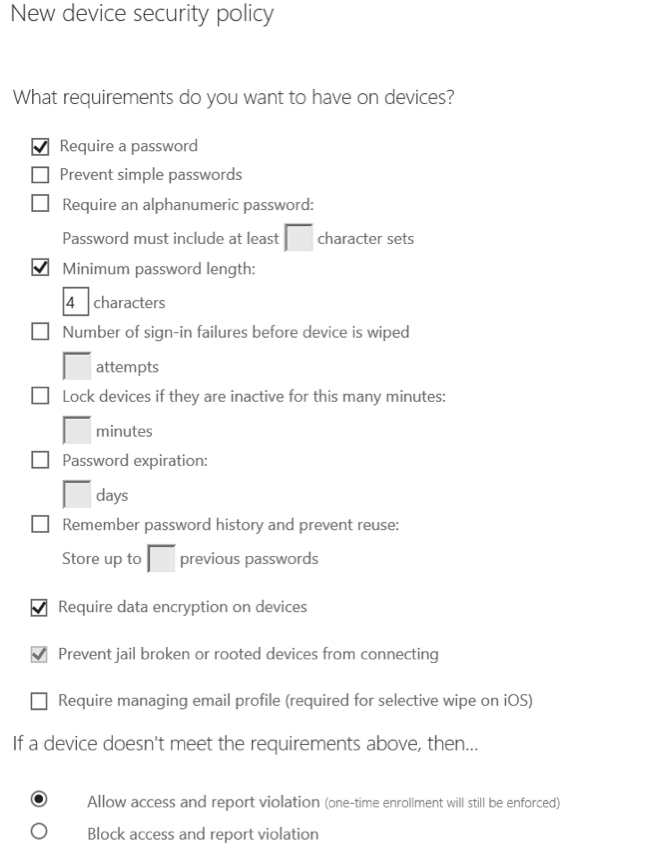
Figure 18: New device security policy
Note: “Prevent jail broken or rooted devices from connecting” can only be unselected if you block access and report violation.
There are some additional settings available for your devices:
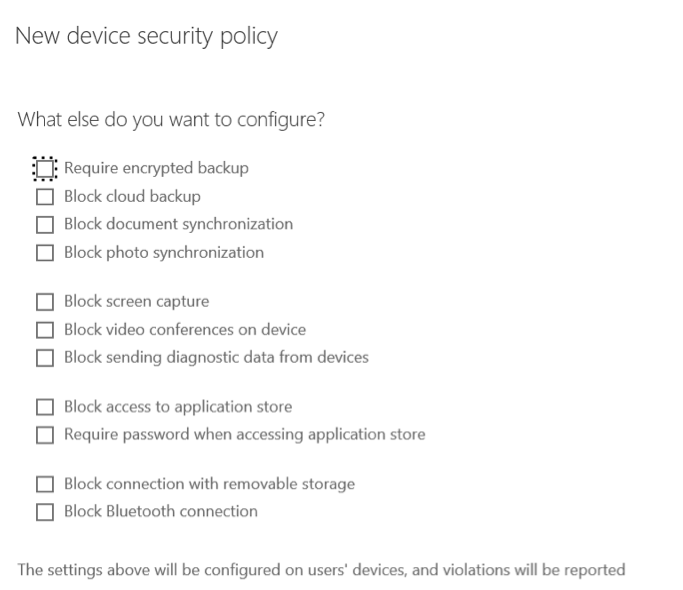
Figure 19: New device security policy – additional settings
Note: To get a list of all supported devices and their functionalities, take a look at Capabilities of built-in Mobile Device Management for Office 365.
Choose if you want to apply your newly created policy immediately or save and apply it later.
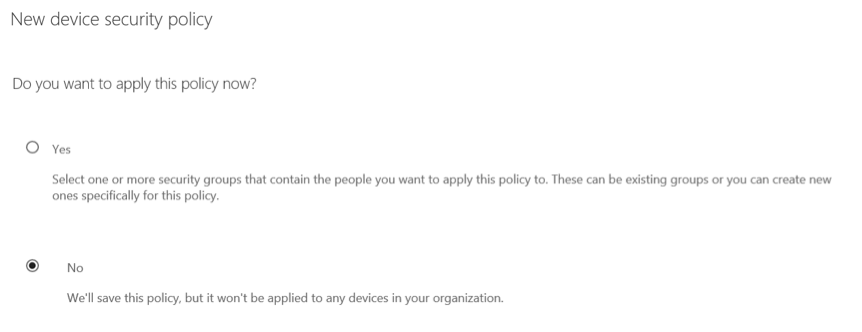
Figure 20: Applying the device security policy
The last step is a short overview of your recently configured device security policy as shown in Figure 21.
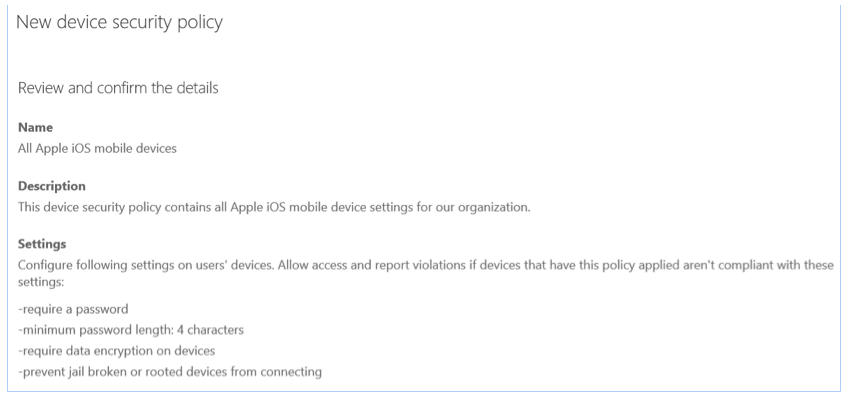
Figure 21: Device security policy overview
The policy is created and available for your users. Of course, you can change these settings every time you like and apply it to one or more security groups. You can also create as many policies as you need for your business requirements.
Important: Policies and access rules created in MDM for Office 365 will override Exchange ActiveSync mobile device mailbox policies and device access rules created in the Exchange admin center. After a device is enrolled in MDM for Office 365, any Exchange ActiveSync mobile device mailbox policy or device access rule applied to the device will be ignored.
Go back to the mobile device section in the Office 365 admin portal as you can see in Figure 1. Let’s configure multi-factor authentication to secure the connection between your servers to devices.
Multi-Factor authentication for Office 365 is powered by Azure Multi-Factor authentication. It works exclusively with Office 365 at no additional cost and is managed from the Office 365 portal. The following features are available:
- Enable and enforce multi-factor authentication for end users
- Use a mobile app as a second authentication factor
- Use a phone call as a second authentication factor
- Use a SMS message as a second authentication factor
- Assign application passwords for non-browser clients
- Default Microsoft greetings during authentication phone calls
Important: If you want to use only Multi-Factor Authentication for Office 365, do not create a Multi-Factor Authentication provider in the Azure Management Portal and link it to a directory. Doing so will take you from Multi-Factor Authentication for Office 365 to the paid version of Multi-Factor Authentication.
Click on Users – Active Users – Set Multi-factor authentication requirements: Set up as shown in Figure 22. 
Figure 22: Set up Multi-factor authentication requirements.
Select the users and click “enable” in the right action pane. You will see the following information pop up: 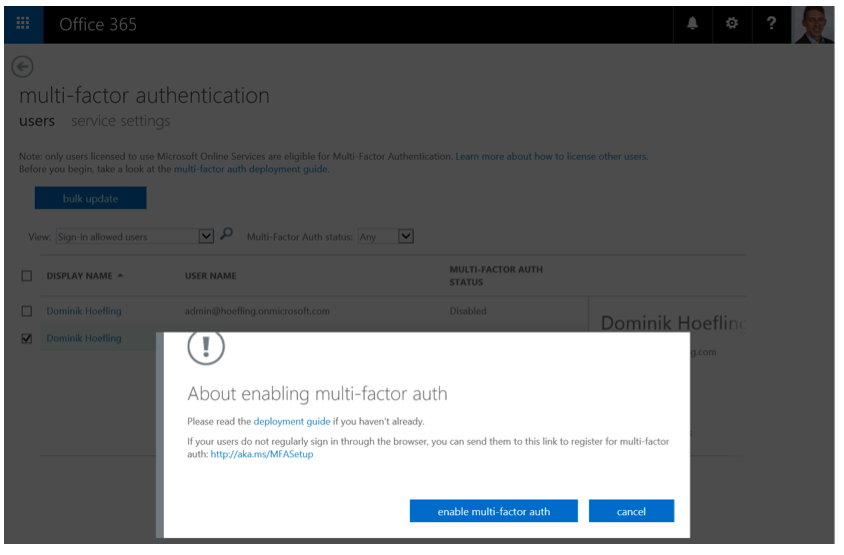
Figure 23: About enabling multi-factor auth
Once you have enabled your users, send them an email that informs them how they can user their non-browser apps, such as Outlook and Lync, with mobile devices.
Your users can visit https://aka.ms/mfasetup to create app passwords or change their MFA settings, such as the additional security verification:
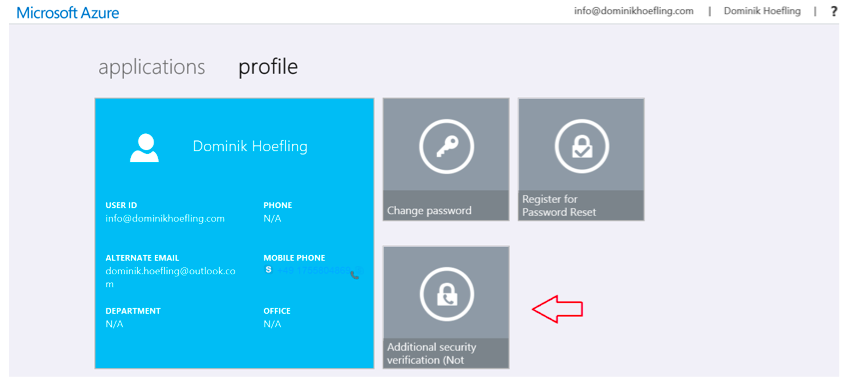
Figure 24: MFA setup
There are multiple configuration settings available as stated in the introduction of this section.
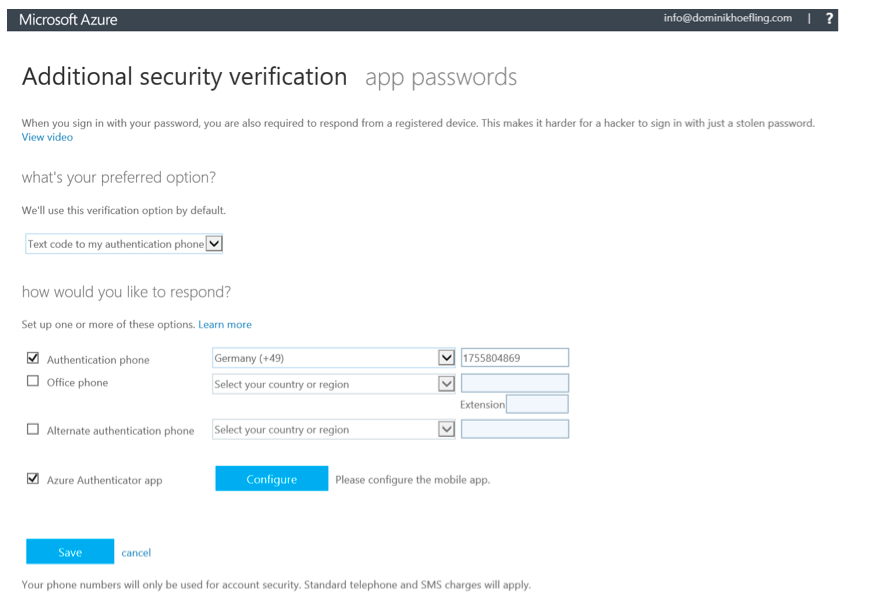
Figure 25: MFA configuration options
Save your configuration changes. You may have to verify your phone number again. This means you will receive a SMS message with a six-digit text code. You certainly want to configure app passwords to sign into Outlook, Lync or other apps installed on your computer or mobile device. You can use the same app password with multiple apps or create a new app password for each app.
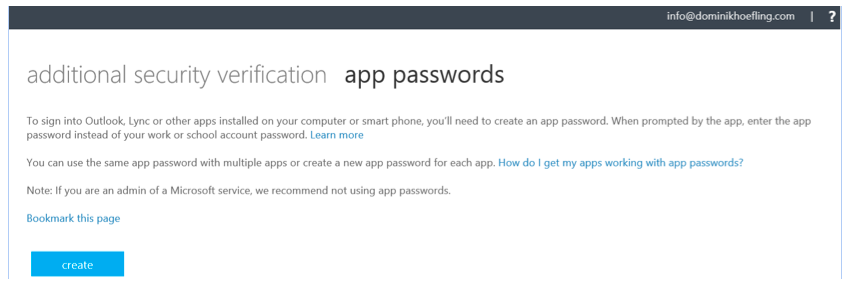
Figure 26: App password settings
The very last thing you will do is to deploy your recently created device policy to your security group(s) with your mobile device members as shown in Figure 20.
Now your organization is able to configure the mobile devices with all configured security and compliance settings shown in this post.
After you set up your device with ActiveSync for accessing Exchange online or configuring an Office 365, such as OneDrive for Business or Outlook, you will receive an enrollment message via email to enroll your device.
You can enroll your devices in Office 365 in multiple ways for multiple vendors. Take a look at Enroll your mobile device in Office 365, which contains iPhone/iPad, Android/Tablet and Windows Phone/Tablet.
Note: Generally, you would be able to wipe devices in the Office 365 Admin Portal. If you set up the “require managing email profile” in your device security policy, users are prompted to remove the organizational email profile they added. Once that’s done, Office 365 will provision the profile to the users device, making it managed.
MDM in Office 365 provides secure access to your organizational email and documents. In a fast growing world for mobile devices, it’s indispensable to enable secure access and compliance within your business.