
Using smart links for Office 365

Just a few years ago identity federation such as AD FS was the de facto standard for managing...

Forwarding might not be one of the most used features when it comes to email, but it’s certainly common enough. I know I’ve had to deal with it in a lot of related cases back in my support days. While most of the issues you might run into are easy enough to solve, there are so many different ways to configure forwarding that oftentimes people get confused. In this article we will review (some of) the forwarding-related options and introduce you to a recent change in handling forwarding in Office 365/Exchange Online.
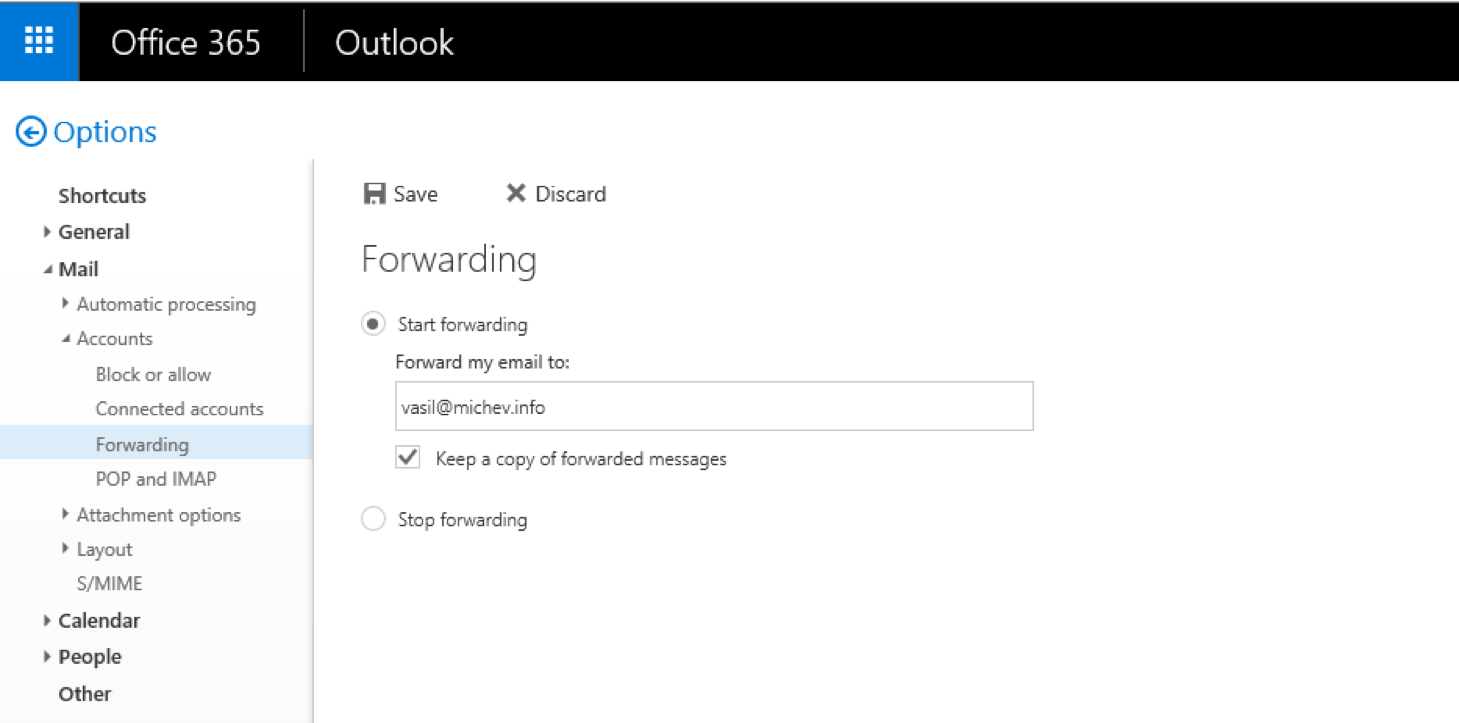
A user typically configures forwarding via the corresponding OWA options, depicted on the screenshot below. You might recognize the new OWA Options interface, but similar option was available in the old interface as well (we will see it the next section). There is no option available to perform the same action in Outlook, and in this article we will not cover the use of “workarounds”, such as Outlook rules.

The interesting part here is what happens behind the scenes. Once the user configures forwarding, Exchange will stamp the ForwardingSmtpAddress property of his mailbox with the address specified by the user in the “Forward my email to” box. Apart from that, the DeliverToMailboxAndForward property is set depending on the selection for the “Keep a copy of forwarded messages” checkbox. Here’s what we will see if we check the relevant attributes via PowerShell:

So far so good, nothing fancy or confusing. Don’t worry, we’re just getting started :)
Now, let’s say you as the admin need to configure forwarding on behalf of the user. It happens more often than you might think and as already mentioned there are multiple ways it can be done. For example, the admin might choose to configure forwarding by using the “Open another mailbox” functionality of the EAC, by clicking his picture on the top right corner and selecting “Another user…”, then selecting the user from the picker dialog. This in turn will open the OWA options page for said user where the admin can configure different settings on behalf of the user. You might recall that in order to configure forwarding in the older OWA options interface, one has to navigate to the Account tab, then Connected accounts:

While the interface here is a bit different, the setting are the same, as will be the end result. For this reason we will not be validating the result via PowerShell as there’s simply nothing new to see.
Another method of configuring forwarding is now available as part of the Office 365 Admin Center preview portal. It’s one of the “quick actions” added to the Users view. To configure forwarding directly from the Admin center, go to Users on the left pane, then Active users. Select the user and on the popup pane on the right, click on Edit next to Email forwarding. You will then be presented with information about the currently configured forwarding settings and the corresponding controls to change them if needed (a screenshot will be provided later on). Remember, this is only available in the Preview portal for the time being, not in the “old” Admin portal.
An admin can of course configure these settings via PowerShell as well, but listing all the available methods is not the intention here. Instead, let’s move on to the next section and finally reveal the plot.
There is however yet another way the admin can configure forwarding via the GUI. This is done by opening the EAC, navigating to the Recipients node and double-clicking on the mailbox in question. Once the “Edit User Mailbox” dialog pops up, one can navigate to the Mailbox features tab on the left and then click the View details link under Mail flow near the bottom. Here, in the “Delivery Options” dialog, you will be presented with the option to configure forwarding address and control the delivery of messages to the original mailbox as well:

You might notice that the wording on the screenshot above is a bit different compared to the one in the previous sections and instead of being able to just type in the address, we need to select it from the picker dialog. The reason behind this is that the settings here configure the ForwardingAddress attribute for the mailbox, as evident from the PowerShell output:

In effect, we have setup forwarding to two different addresses now, one specified by the ForwardingAddress attribute, and another one specified by ForwardingSMTPAddress. The former one, ForwardingAddress, can only be controlled by administrators and has precedence over ForwardingSMTPAddress. This is clearly noted in the help for the Set-Mailbox cmdlet:
If you configure values for both the ForwardingAddress and ForwardingSmtpAddress parameters, the value of ForwardingSmtpAddress is ignored. Messages are forwarded to the recipient specified by the ForwardingAddress parameter.
Another important difference between the two attributes is that ForwardingAddress only accepts valid recipients within your organization. If you want to forward to external address, you will need to first create a contact object for said address within your organization, as I have done in the above example.
Now, as evident from the above, it was relatively easy to create a mess when configuring forwarding, as an unsuspecting admin might just configure the “wrong” setting. In which case, the admin (and the user) might observe some confusing results. And that’s even without considering the other possible factors that can affect forwarding, such as transport rules or calendar processing options!
With all that in mind, Microsoft has stepped in and introduced some changes that should help better guide both end users and admins alike. With these changes, when a user tries to configure forwarding via OWA and ForwardingAddress has already been configured, the following warning will be displayed:

Yes, this is the old OWA interface, but the choice of screenshot is deliberate. First, it’s the same warning that an admin would see if he uses the “Open another mailbox” method to configure forwarding, so it saves us from looking at yet another screenshot. Second, this warning seems to be yet unavailable in the new OWA options interface, which I guess is something that will quickly be addressed by the relevant teams at Microsoft.
Another place where similar warning has been introduced is the Office 365 Admin center preview portal. Unlike the other GUI methods, details about both ForwardingAddress and ForwardingSMTPAddress will be surfaced here, along with a warning if “conflict” is detected. Here’s how it will look:

As seen from the screenshot above, if both forwarding attributes are configured you get a nice warning along with a quick link to remove the ForwardingAddress value, as well as a recommendation to use Transport rules should you want to forward messages to multiple addresses. Until you have removed the ForwardingAddress value, and thus handled the conflict, the dialog will not allow you to make any changes of the ForwardingSMTPAddress.
No warning will popup if you try any of the other methods, including setting up ForwardingAddress via the EAC. It makes sense, because of the precedence ForwardingAddress has, but I wouldn’t be surprised if this option disappears in the future. Microsoft’s goal here is to simply steer you away from using all those different methods. Instead, a unified approach based on ForwardingSMTPAddress is recommended.
As already mentioned in the beginning of this section, no warning will popup when using the new OWA options interface either, but I expect this will change in the near future. No warning will be shown in PowerShell as well.
In this article we did a quick review on (some of) the methods available for configuring forwarding in Office 365. While this is a relatively easy task, the multitude of options we have can result in creating confusion even in the mind of more experienced users, and with that in mind Microsoft has decided to make some changes. We are now presented with warnings whenever a conflicting configuration has been detected and we are also being encouraged to use the ForwardingSMTPAddress as preferred method. While to some people these changes might feel like Microsoft is again dumbing down features and hand-holding the user, personally I believe they are step in the right direction.