Azure Active Directory Roles for EXO Administrators

AAD Roles for EXO Administrators
In one of my other articles “Accessing Exchange Online Objects” I...

Using Microsoft Graph PowerShell SDK
In my previous article about creating custom roles for Exchange Online administrators here, I described how to grant a specific team of administrators permissions to grant admin consent ONLY for specific OAuth2.0 application permissions.
When I wrote the article, I used Azure AD PowerShell module to perform all the configuration steps. I hope you all have already heard about it:
Microsoft planned deprecation of PowerShell modules for at least the MSOL and AAD one. You can read about this on the following links:
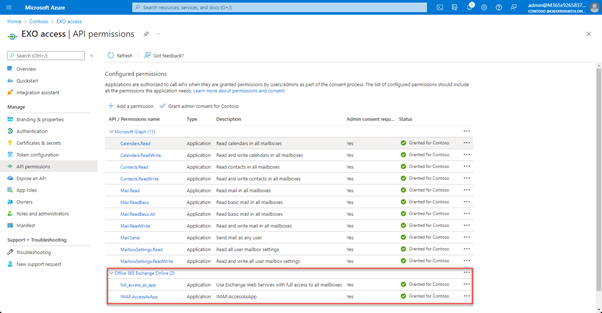
With this, I translated all the commands and steps and used the Microsoft Graph PowerShell SDK. Besides of this there are also some updates related to the supported permissions:
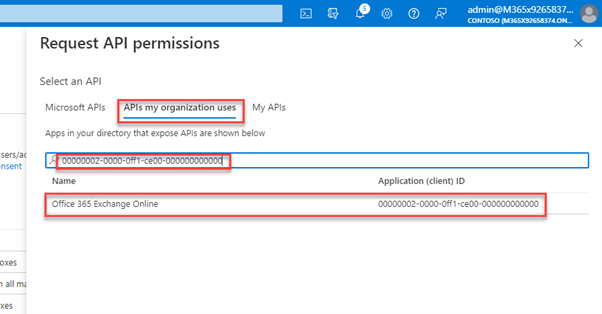
Both new permissions are not part of Microsoft Graph! As you can see, they belong to Office 365 Exchange Online and IMAP is still in development (even though GA is planned in June 2022 Microsoft 365 Roadmap | Microsoft 365):
The easiest way to pick them is using the AppId for EXO 00000002-0000-0ff1-ce00-000000000000 and you must use APIs my organization uses:
The steps have changed a bit and are as follows:
I highly recommend using PIM in your daily work for such high privileged accounts. You can find more information here:
What is Privileged Identity Management? - Azure AD
First, we need to connect using the necessary permissions (Connect-MgGraph):
Connect-MgGraph -Scopes Application.Read.All,Policy.ReadWrite.PermissionGrant,RoleManagement.ReadWrite.Directory
Retrieve the IDs of the supported permissions from Microsoft Graph and Exchange Online
# Get the Microsoft Graph and Exchange Online service principal
$MSGraphEXOSPN = Get-MgServicePrincipal -Filter "(AppId eq '00000002-0000-0ff1-ce00-000000000000') or (AppId eq '00000003-0000-0000-c000-000000000000')"
# extract AppRoles
$EXOAppRoles = ( $MSGraphEXOSPN | Where-Object { $_.AppID -eq '00000002-0000-0ff1-ce00-000000000000'} ).AppRoles |
Where-Object { $_.Value -match '^(full_access_as_app|IMAP.AccessAsApp)$'}
$MSGraphAppRoles = ( $MSGraphEXOSPN | Where-Object { $_.AppID -eq '00000003-0000-0000-c000-000000000000'} ).AppRoles |
Where-Object { $_.Value -match '^(Mail\.[a-zA-Z]*\.?[a-zA-Z]*?|MailboxSettings\.[a-zA-Z]*\.?[a-zA-Z]*?|Calendars\.[a-zA-Z]*\.?[a-zA-Z]*?|Contacts\.[a-zA-Z]*\.?[a-zA-Z]*?)$'}
Create a PermissionGrantPolicy (New-MgPolicyPermissionGrantPolicy)
# create base policy
$permissionPolicy = @{
Id = 'exchange-admin-consent-policy'
DisplayName = 'Exchange Administrator consent for ApplicationAccessPolicy supported application permissions only'
Description = 'Consent policy to allow Exchange administrators grant supported application permissions admin consent.'
}
$exchangePolicy = New-MgPolicyPermissionGrantPolicy @permissionPolicy
Include all permissions into the created policy (New-MgPolicyPermissionGrantPolicyInclude):
# create condition sets for all permissions
foreach ($perm in $EXOAppRoles)
{
$conditionSet = @{
PermissionGrantPolicyId = $exchangePolicy.Id
PermissionType = 'application'
Permissions = @($perm.Id)
ResourceApplication = '00000002-0000-0ff1-ce00-000000000000'
}
New-MgPolicyPermissionGrantPolicyInclude @conditionSet
}
foreach ($perm in $MSGraphAppRoles)
{
$conditionSet = @{
PermissionGrantPolicyId = $exchangePolicy.Id
PermissionType = 'application'
Permissions = @($perm.Id)
ResourceApplication = '00000003-0000-0000-c000-000000000000'
}
New-MgPolicyPermissionGrantPolicyInclude @conditionSet
}
Create a RoleDefinition, which contains the PermissionGrantPolicy (New-MgRoleManagementDirectoryRoleDefinition):
# Create a custom role which allows granting permissions conditioned on the Exchange consent policy.
$roleDefinition = @{
DisplayName = 'Exchange Administrator ApplicationAccessPolicy Admin Consenters'
Description = 'Custom role for Exchange Administrators to grant admin consent for certain permissions.'
IsEnabled = $true
RolePermissions = @(
@{
'allowedResourceActions' = @(
("microsoft.directory/servicePrincipals/managePermissionGrantsForAll.{0}" -f $permissionPolicy.Id )
)
}
)
ResourceScopes = @('/')
}
$exchangeRole = New-MgRoleManagementDirectoryRoleDefinition -BodyParameter $roleDefinition
Assign the role to a user (New-MgRoleManagementDirectoryRoleAssignment):
# Assign the custom role to a user
$user = Get-MgUser -Filter "Displayname eq 'Lynne Robbins'"
$roleAssignement = @{
"@odata.type" = "#microsoft.graph.unifiedRoleAssignment"
roleDefinitionId = $exchangeRole.Id
principalId = $user.Id
directoryScopeId = '/'
}
New-MgRoleManagementDirectoryRoleAssignment -BodyParameter $roleAssignement
As this assignment is permanent, I would like to give you also the option to use PIM as previously recommended:
# use PIM
# cmdlet is only available in Beta so you need to switch the profile:
# Select-MgProfile -Name 'Beta'
$params = @{
action = 'adminAssign'
justification = 'Assigned for grant admin consent'
roleDefinitionId = $roleDefinition.Id
directoryScopeId = '/'
principalId = $user.Id
scheduleInfo = @{
startDateTime = $(Get-Date -Format u)
expiration = @{
type = 'noExpiration'
}
}
}
New-MgRoleManagementDirectoryRoleEligibilityScheduleRequest -BodyParameter $params
For more information about PIM and how to use with Microsoft Graph, I recommend reading the following documentation:
I hope the scenario described above will help you. If this is not exactly matching your needs, you might still want to have a look into these capabilities and modify the code as needed.

.png?height=175&name=Untitled%20design%20(4).png)
In one of my other articles “Accessing Exchange Online Objects” I...