Advanced Security Management in Office 365 — Part 1

In a series of articles here on ENow’s blog over the past few months, we covered a wide variety of...

In the previous part of this series, we did a short overview of the Advanced Security Management (ASM) feature, we discussed how to enable and access it and then did a quick tour of the ASM Management portal. Now, let’s focus on working with Policies, Alerts and the Activity log.
Creating a new Activity or Anomaly detection policy is a pretty straightforward process, and the core elements are very similar to the Activity alerts we reviewed previously, so we will focus mainly on the differences.
To create a new policy, navigate to the Control tab and select Policies, then press the Create policy button and select the policy type. It’s advisable to build your ASM Activity policies on top of one of the predefined templates, but you can also create one from scratch. Apart from templates, you can also categorize the policy by Severity or Category. The next step is to select the action(s) to monitor. Compared to Activity alerts in the SCC, a new element here is the option to trigger the policy only when multiple infractions have occurred. For example, this can mean 5 failed logins within 5 minutes, or 30 file downloads within 10 minutes.
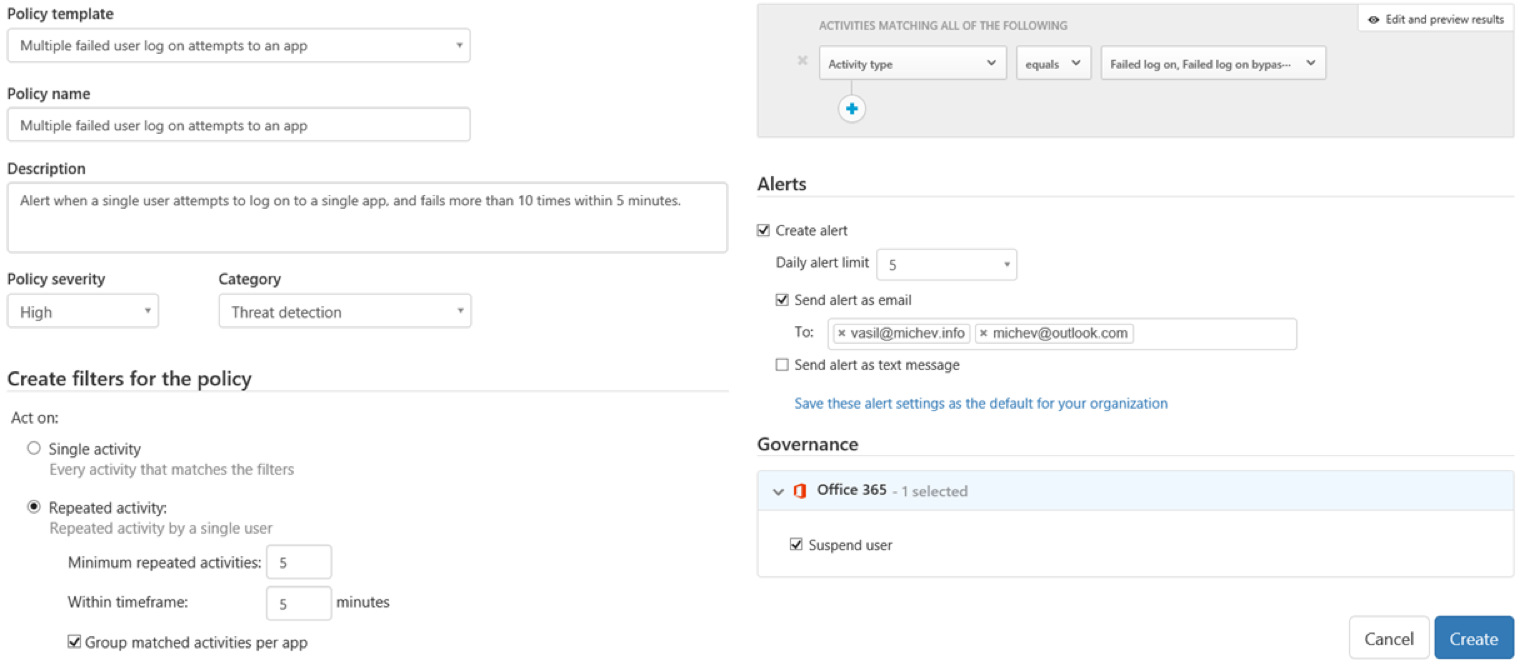
Of course, you are not limited to only selecting action(s). If needed, you can create policies based on username, device or client information, IP address and so on. Or even a combination of multiple criteria. Overall, you get a lot of flexibility. However, the fairly limited number of entries to select from in the dropdown menus can be a nuisance.
You also get more flexibility with issuing notifications. Those can be delivered either as email or as a text message, and you can also set a limit on the number of alerts that will be generated per day. The most important difference however is Governance, or in other words, the option to take an action other than alerting you. For the time being, the only such action you can perform is to Suspend the user account. For comparison, a list of all supported actions for Cloud App Discovery can be found in this article.
The Anomaly detection policy creation process is very similar, however, the purpose of these policies is a bit different. Think of Anomaly detection policies as alerts for generating a new entry in any of the Anomalous activity reports available in the Azure portal. Those include things like “Sign ins from unknown sources” or “Impossible travel” scenarios, all of which can be toggled to generate alerts. In addition, you can select whether a specific type of anomaly detection is monitored against all activity events, or only select ones. In the later scenario, you can use the familiar filtering controls we discussed above.
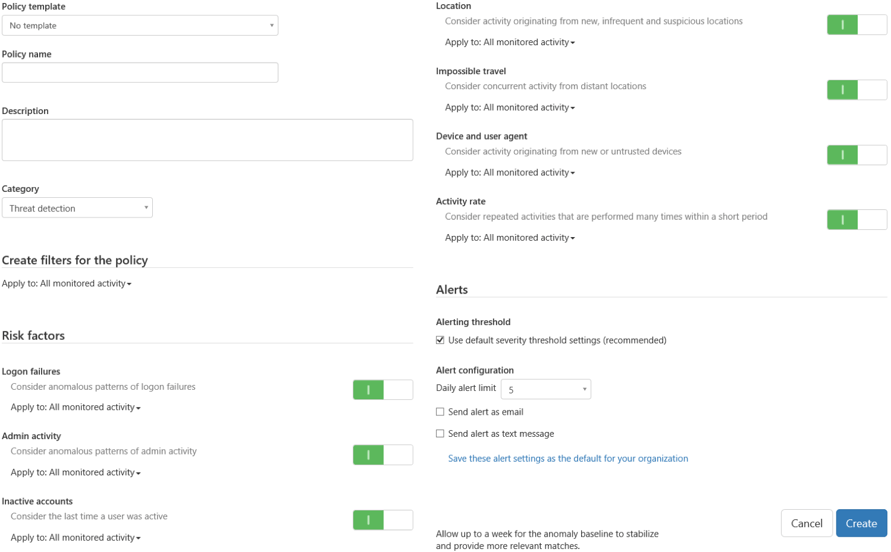
If planning to use Anomaly policies, it’s advisable to allow the service some time to establish a baseline in order to reduce the number of false-positives, with a one-week period recommended by Microsoft. No Governance actions can be configured for Anomaly detection policies; you can only configure alerts.
In case you need detailed instructions about the creation process, such can be found in this article for Activity policies or this one for Anomaly detection policies.
Once you have configured the policies, your daily tasks within the ASM portal will be related to monitoring Alerts and getting additional insights via the Activity logs. Of course, some fine-tuning of the policies will probably be required, which is another task those tools can help you with.
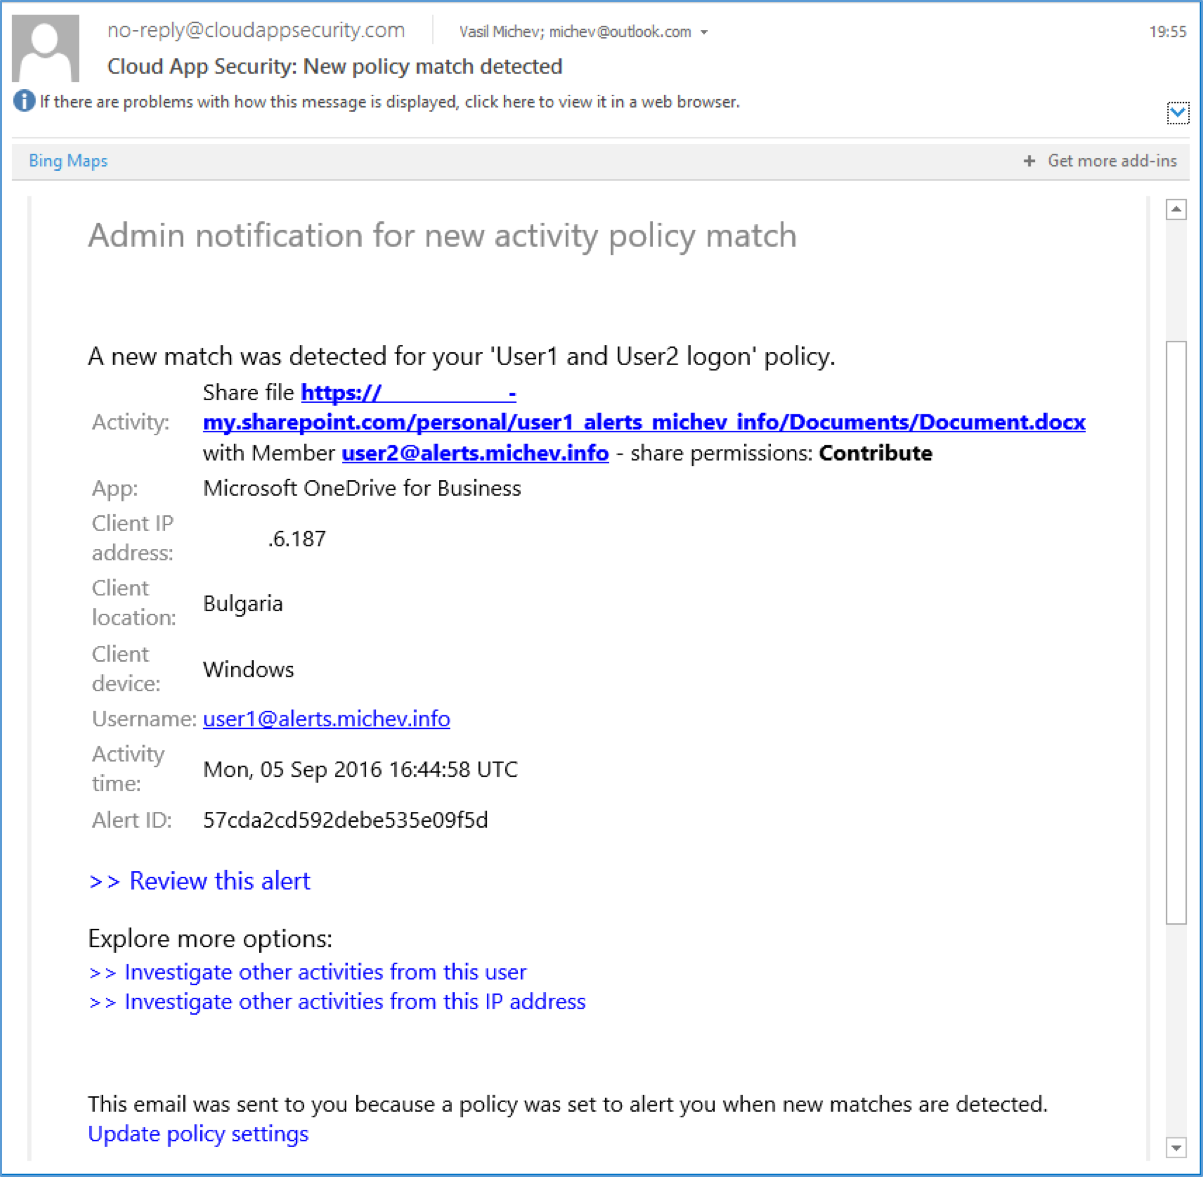
The screenshot below shows an example alert generated by an Activity policy. In this case, it’s a (sanitized) alert triggered by the “share file” action. Apart from the user generating the event, we can see additional information regarding the workload, client IP address, location and device, the activity time, the exact action performed and the name of the policy that was matched. Clicking the “Review this alert” link will take you to the relevant section in the ASM portal. The hyperlinks at the bottom of the message allow for quick access to the policy and the activity log.
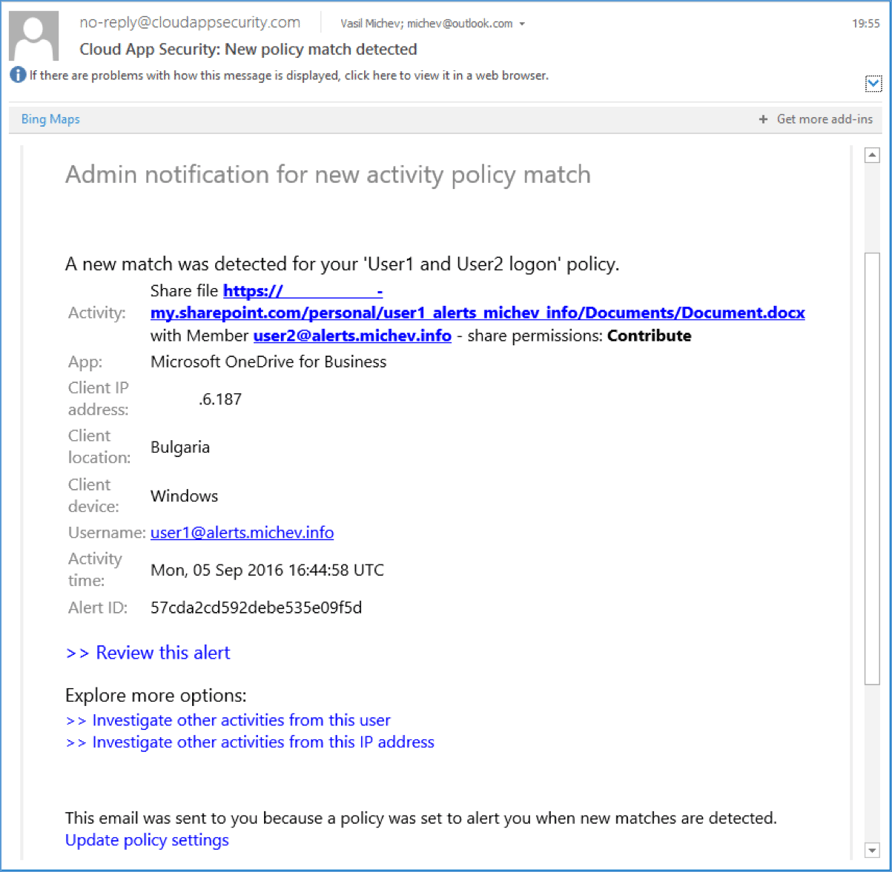
All the generated alerts will be coming from the no-reply@cloudappsecurity.com address. While the address itself is hardly an issue, the interesting part is that those messages are still being relayed through external party (mandrillapp.com), which is likely to be a problem for some organizations.
Once an alert has been generated, you will likely want to examine the user actions using the Activity log. Reviewing recent user's activities or filtering by location/IP address should give you additional details and might help you rule the alert as a false positive/false negative and take necessary actions. A minor issue with the email alerts is that no information about any governance actions performed is included (suspending the user), but even if it was, it’s always a good idea to double-check on things and get a better understanding of the situation.
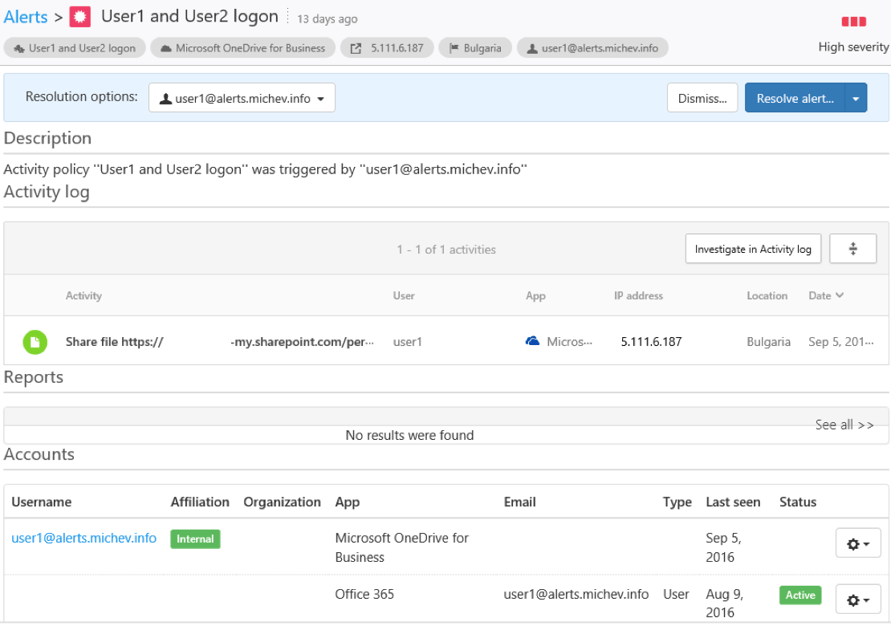
Alternatively, you can head off directly to the Alerts section to handle the alert. You can choose between Dismissing the alert as false-positive, Resolving it (which basically means acknowledging it without taking any further action) or clicking on it to bring additional details with in-context information about user activities and the option to Suspend the user. Detailed instructions and additional information on handling alerts can be found in this article.
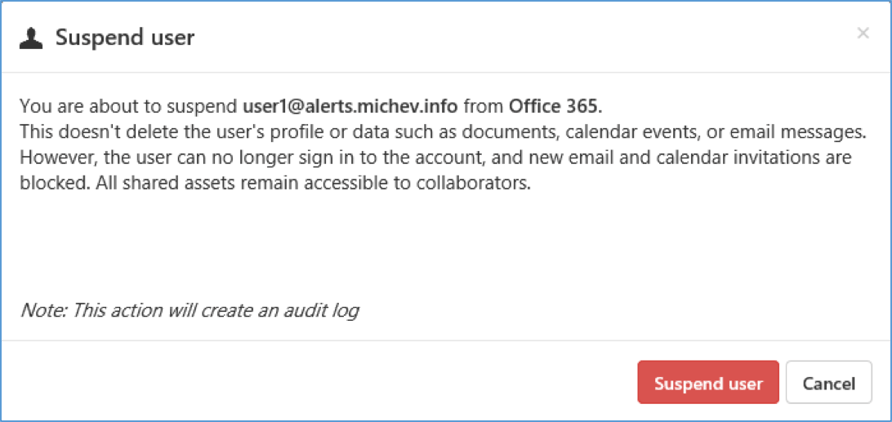
As mentioned above, no information about suspending the user is included in alerts. The suspend action itself is not properly described (see screenshot below) or simply doesn’t function as advertised. While the user account indeed gets blocked, the “new email and calendar invitations are blocked” part is not enforced in any way. There are many different mechanisms available to facilitate such action in Exchange, for example, mailbox delivery restrictions or Transport rules, but nothing of the sorts happens. The suspended user can still receive mail, only the login status is changed.
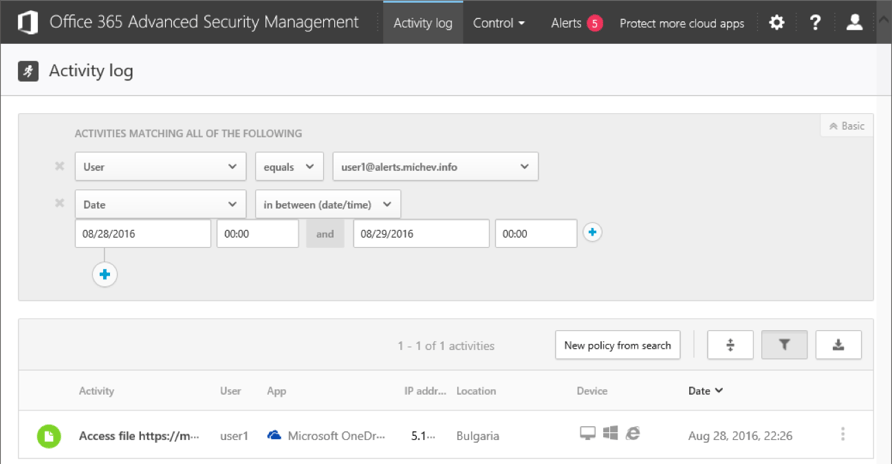
To continue with the bad news, alerts/actions are nowhere near as fast as they should be. It can take anywhere from a few minutes to several hours for a policy match to be generated, and this is definitely something you need to take into consideration if you are planning to use ASM. While some events appear with delay in the logs, others can be still missing even a week after the action was performed. For example, let’s take a look at the activities performed by user1 on Aug 28, shown on the picture below. As you can see, there is no trace of any login activity, and the audit trail starts with him accessing a file in OneDrive for Business.
If we perform the same search for user activities in the SCC, the situation is a bit different – multiple login events have been logged prior to the “Accessed file” entry:
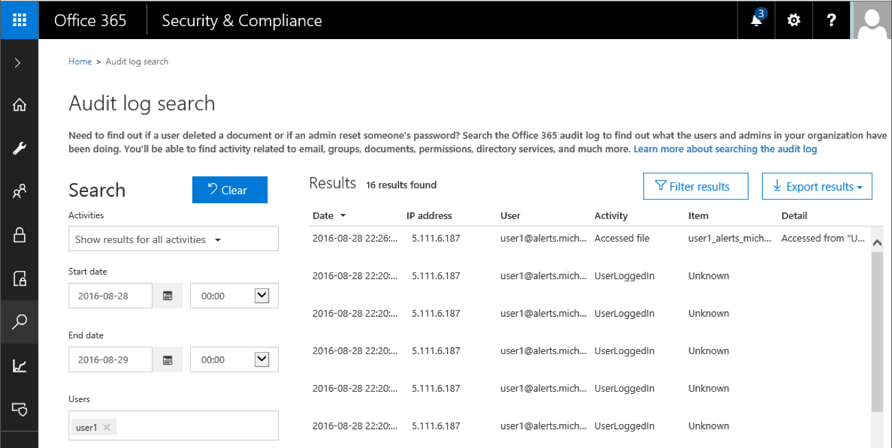
So even though a week has passed, the Login events for user1 haven’t yet made it to ASM, and no policy was triggered. In effect, I had to rely on events such as “shared file” instead to generate the examples in this article. While such behavior can be forgiven for workloads such as Sway, PowerBI or even eDiscovery (auditing for which is currently in Preview, and as such, they are not listed as available in ASM), the fact that even basic events such as Logon cannot be relied upon is something to think about before purchasing the service.
In all fairness, we cannot only blame ASM — the Audit log in general is not as reliable as it should be. In turn, any functionality that relies on the events collected by the unified auditing infrastructure should be carefully evaluated. Another factor you need to think about when considering policies based on logon events is token caching because many of the Office 365 services will happily allow the user access for prolonged periods of time without re-authenticating him. If you are planning a policy based on mailbox activity, remember to actually enable the mailbox audit feature, as well as auditing of owner actions, if needed.
As a last remark here, there are currently no PowerShell cmdlets available to manage ASM functionality. But with the Cloud App Security PowerShell module released, we should probably be getting a version compatible with ASM soon.
In this article, we did a short overview of the Advanced Security Management feature in Office 365. After a brief introduction, we discussed how to enable and access the feature and then took a tour of the ASM portal. Later on, we covered working with ASM policies, as well as the Alerts and Activity logs functionalities.
While ASM definitely looks interesting and is probably an easy sale for the marketing guys, in reality it’s value is severely diminished by similar functionalities offered by other Microsoft products, such as the Activity Alerts in SCC or Azure AD Identity Protection. The pleasant UI and the ability to block the user account upon matching a policy are great, but the price of $3 per user per month however feels a bit too steep for it. With the APIs now available with the Microsoft Graph, ISVs will surely be able to provide all this functionality and more, at a lower price tag.


A few months back, we did a short introduction to Advanced Security Management (ASM), a...