How to Tackle Exchange 2010 Backup and Recovery

As an Exchange administrator, backup and recovery of your databases is an important aspect of your...

So, you have server-side applications that are internal to your environment and require a mechanism in order to send email, but the system itself cannot use a mailbox account due to application limitations. What do you do? In this case you will likely setup relay connectors on your Exchange servers. Before you set these up however, there is one key question to ask.
Will I allow my users to relay internally, externally, or both?
The reality is that the answer to the question comes down to your organizational security policies, so work with your security team before implementing anything. An example of when you might need relayed mail to leave your organization would be if they would need to go to pagers that are not setup within Active Directory/Exchange. If this is the case then an external relay may be required. Once your decisions are made, then the rest is up to you.
This article assumes that you will setup two new connectors on two Hub Transport Exchange Servers. In this example we will have a connector setup for internally relayed mail from other systems and another that will handle both internally and externally relayed email.
Sample IP addresses and DNS Name Scheme
|
|
HubTransportServer1 |
HubTransportServer2 |
|
Server IP |
172.16.1.2 |
172.16.1.3 |
|
InsideEmail.company.com |
172.16.1.3 |
172.16.1.4 |
|
InOutEmail.company.com |
172.16.1.5 |
172.16.1.6 |
You will want to have names such as InsideEmail.company.com or InOutEmail.company.com in place. This FQDN will also be the name that is used for load balancing between the servers and redundancy. This can be DNS round robin, Microsoft Load Balancing or a hardware load balancer. If you choose to use the hardware load balancer be sure to take the time to research Microsoft’s setup recommendations for Exchange and your load balancer.
a. Start, Control Panel
b. Network and Sharing Center
c. Click Change Adapter Settings
d. Right-click on your Network Card and choose Properties
e. Click on Internet Protocol Version 4 (TCP/IPv4)
f. Click the Properties button
g. Click the Advanced button
h. On the IP Settings Tab, under IP Addresses click the Add button
Note: Repeat the above process for each IP address you will add to the server.
3) Also request DNS names that will resolve these connector IP’s to your new IP’s (example: InsideEmail.company.com or InOutEmail.company.com)
Once steps 1, 2 and 3 are complete you are ready to create your connector.
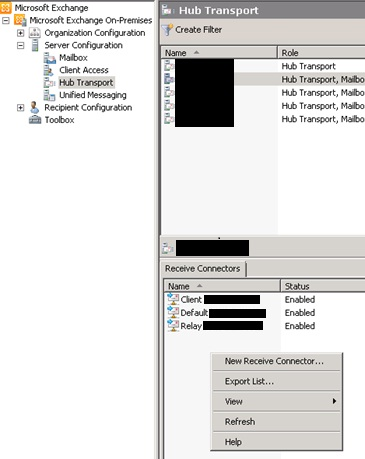
1) Open your Exchange Management Console, go to server configuration, and click Hub Transport
2) Then right-click in the Receive Connectors pane and choose “New Receive Connector”

3) Fill in a name similar to what is shown below and choose Custom from the drop down, then Click "Next"

4) Use the ![]() to remove the existing IP Range and add the IP address (example: 172.16.1.3) that you requested for this connector on this server. Then fill in the appropriate FQDN for the connector (example: InsideEmail.company.com) then click "Next"
to remove the existing IP Range and add the IP address (example: 172.16.1.3) that you requested for this connector on this server. Then fill in the appropriate FQDN for the connector (example: InsideEmail.company.com) then click "Next"

5) Start by adding a single IP address of a server that will need to send mail to the connector that you are creating then click "Next"
Note: Another option would be to add you internal IP address ranges for your servers. Again make sure whatever you enter here complies with your internal security policies.

6) Click "New" to complete the Wizard
Note: At this point the connector is built, but there are a few more settings to configure before this setup is complete.
7) In the Exchange Management Console, right-click on the new connector and choose "properties"
8) On the General Tab, adjust the protocol logging level to verbose to improve your message tracking capabilities and adjust the maximum message size to meet the standards of your organizations message size restrictions (example: 10MB)

9) On the Authentication Tab, verify that only Transport Layer Security (TLS) is selected

10) Click the Permission Groups tab and ensure that “Anonymous Users” is checked
11) Click "Ok"
Note: At this point you now have a relay connector that will relay messages to internal recipients. You will need to repeat this process on each hub transport server you have in your environment. The only difference will be the IP address you add in step 4 above.

You may find that your organization has circumstances that will require you to allow systems to relay mail externally. Again make sure you are complying with your internal security policies before setting this up.
1) Repeat steps 1 – 11
Note: Use a unique IP address for step 4 and the FQDN should also be specific to external relays. (Example: InOutEmail.company.com)
2) Open Exchange Management Shell
3) Type Get-ReceiveConnector "<Connector Name>" | Add-ADPermission -User "NT AUTHORITY\ANONYMOUS LOGON" -ExtendedRights "Ms-Exch-SMTP-Accept-Any-Recipient"
4) Press Enter
5) Repeat until applied to each connector that will be allowed to externally relay mail