[Exchange Monitoring]: Introduction to Managed Availability (Part 3)


Many people want to use multiple IP addresses on a single NIC interface with Exchange 2013 and Windows Server 2012. There are several reasons for this multi-homed IP configuration, such as various receive connectors for diverse applications (fax, SharePoint, gateways, etc.), or for an additional IIS website, amongst other things.
The behavior that changed since Windows Server 2008 is that the source IP address on a NIC will always be the lowest numerical IP address. The challenge for every Exchange administrator is to configure the correct firewall settings for the appropriate IP address. Lets make an example:
You install the the first Exchange 2013 server in your environment with the „primary“ IP address of 10.35.3.200. Afterwards you decide to add an additional IP address to your MAPI network adapter, such as for a further receive connector. The secondary IP address would be 10.35.3.100. No you have two issues:
Let's go a bit deeper and explain the “weak host model“ and the “strong host model“ for multi-homed servers and how they choose the source IP address selection.
The "weak host model" is used in all Windows operating systems prior to Windows Vista. This means that the OS will accept any and all IPv4 packets addressed to the computer. Advantages of the weak host model such as the better network connectivity which makes it easier to find any packets arriving at the server using tools such as netmon. The biggest disadvantage of this model is the inferior security compared to the strong host model.
Note: IPv6 packets already uses the strong host model, also for operationg systems prior to Windows Vista.
The “strong host model“ is used in all Windows operating systems since Windows Vista+. The OS only accepts IP packets that are sent to the specific IP address at the NIC interface where the packet is received. The TCP/IP stack supports the strong host model for both IPv4 and IPv6 and is configured by default. However, it can also be configured to use the weak host model, which is necessary in some scenarios. An advantage is the improved security through the now segregated traffic and more efficiently utilized bandwidht. However,that has a negative effect on overal network connectivity, as it is more sluggish to move a specific source IP packet to a specific destination IP packet.
Note: Exchange 2013 will always use the preferred IP address within the same network for all outbound traffic from the send connector, even if the send connector has multiple IP addresses configured.
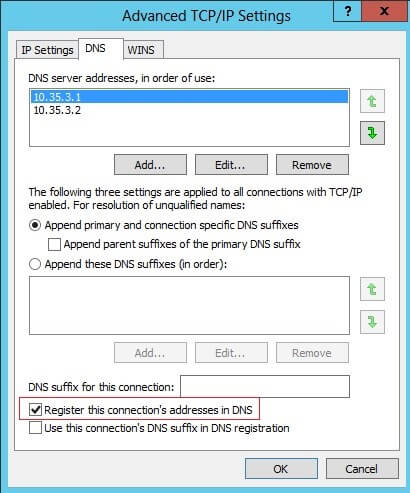
Microsoft recommends to set the “Register this connection’s addresses in DNS“ fort he TCP/IP v4 properties for a MAPI network adapter, independent from the number of configured IP addresses on the network interface, on every Exchange 2013 server. This setting causes all the secondary static IP addresses from your MAPI network adapter to be registered in DNS as well. In its turn, this leads to multiple static DNS entries for a single server.

To prevent the server from registering all of its IP addresses into DNS, use the Set-NetIPAddress cmdlet from the Windows PowerShell and set the flag “SkipAsSource“ to True. By using this flag, the new IPs added will not be used for outgoing packets unless the application specifically binds to it. Use the following cmdlet to prevent the IP address 10.3.35.100 being registered into DNS:
Set-NetIPAddress –IPAddress 10.3.35.100 –InterfaceAlias „Local Area Connectoin“ –SkipAsSource $True
Important: Don’t disable the “Register this connection’s addresses in DNS“ for Exchange 2013 because it will cause an issue with Managed Availability where it will repeatedly restart your server.
You can check the initial SkipAsSource settings with the following cmdlet:
Get-NetAdapter –InterfaceAlias „Local Area Connection“ | Get-NetIPAddress | Select IPAddress, SkipAsSource

As you can see, both IP addresses 10.35.3.83 and 10.35.3.82 are registered in the local DNS servers and both IPs use outgoing traffic from the Exchange 2013 server.
In our example we will set the flag SkipAsSource for the IP address 10.35.3.83 to True to prevent
Set-NetIPAddress –IPAddress 10.35.3.83 –InterfaceAlias –SkipAsSource $True

The IP address 10.35.3.83 will not be registerd in the local Microsoft DNS server because the flag SkipAsSource was set to True.
Important: The common problem with Windows Server 2012: if for some reason you need to set the SkipAsSource flag to True, please don’t edit the IP configuration of your MAPI network adapter afterwards via the GUI! If the GUI is used, the SkipAsSource flag will be set to False (default) for the IPs that were modified. If you want to change an IP address and the SkipAsSource flag is set to True, use the PowerShell cmdlets Get-NetAdapter, Set-NetAdapter, and New-NetIPAddress to edit, add, or delete an IP address from your MAPI network adapter.
Note: All cmdlets are only available in Windows PowerShell 3.0+. If you are using Windows Vista and Windows Server 2008, install the following hotfix: KB975808
If you are using Windows 7 or Windows Server 2008 R2, install the following hotfix: KB2554859
For all Windows operating systems prior to Windows 8 or Windows Server 2012, use the Netsh cmdlet to change the SipAsSource flag.
If you would like to set the flag to multiple servers, you can use the following PowerShell script. This script will use the input you define in the variables $primIP and $nicInterface. Save the script under your preferred path as a .ps1 file extension, for example „SkipAsSource.ps1“ and run the script via the cmdlet .\SkipAsSource.ps1 from your PowerShell.
$primIP
=
"10.35.3.83"
//set the primary NIC ip address of your MAPI network

$nicInterface
=
"Local Area Connection"
//define the network adapter alias of your MAPI network

[
array
]
$secIPs
=
(
gip
).IPv4Address
|
Where-Object
{
$_
.InterfaceAlias
-eq
$nicInterface
-and
$_
.IPAddress
-ne
$primIP
}
//get all IPv4 addresses excluding the primary IP address for your MAPI network

Set-NetIPAddress
-IPAddress
$primIP
-InterfaceAlias
$nicInterface
-SkipAsSource
$false
//set the flag SkipAsSource of the primary IP address to False

Set-NetIPAddress
-IPAddress
$secIPs
.IPAddress
-InterfaceAlias
$nicInterface
-SkipAsSource
$true
//set the flag SkipAsSource of all other IP addresses, except the primary IP address of your MAPI network to False


Now that you’ve finished Part I of...