Part 1: Speed Up Migrations to Exchange Online

This is a multi-part article in which we will cover Migration Endpoints. First, we will cover what...

This is a multi-part article in which we will cover Migration Endpoints. First, we will cover what Migration Endpoints are, what you use them for and how you can manually configure a migration endpoint. In the second part of this article, we will dive deeper into how you can leverage multiple migration endpoints to potentially speed up your migration to Exchange Online. Lastly, we'll discuss some of the most common mistakes regarding Migration Endpoints and how to avoid or solve them.
In part 1 of this article we explained what migration endpoints are, how they are used in moving mailboxes to Office 365 and how to improve the performance of a (single) migration endpoint.
It goes without saying that the overall recommendations in regards to firewalls and networking devices also apply with multiple migration endpoints. By now, I hope you also realize when to create a new migration endpoint and when not. If you only have a few Exchange servers, adding more endpoints does not make a lot of sense, as the performance limit is likely due to something else. But if you're dealing with a large, perhaps even multi-geo, environment, having more endpoints adds flexibility and can improve performance.
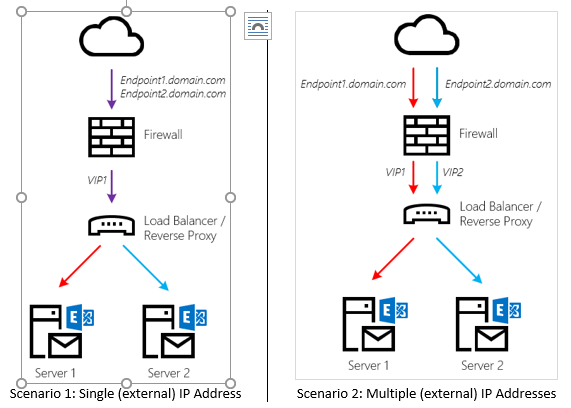
Before diving into the PowerShell cmdlet to create a new endpoint, let's look at what you need to define an endpoint. Next to a Display Name (Name) and credentials of the migration account, you need the endpoint itself. This will be a DNS name which – ultimately – points to an IP address of your on-premises organization.
To add multiple endpoints, you can do one of the following:

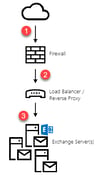
What is important to note here is that the Load Balancer or Reverse Proxy does not load balance traffic to an array of Exchange Servers. Instead, each endpoint is mapped to a single backend Exchange Server. The benefit of doing so is that connections between Office 365 and the Client Access components (MRS Proxy) don’t have to be re-established and the traffic flow is predictable.
Will you lose HA on your endpoint if the Exchange Server goes down? Yes, but that is not a problem. If push comes to shove and you cannot (quickly) recover a failed Exchange server, you can always map a different Exchange server instead and the mailbox moves will once again proceed happily. Although this requires a manual intervention, mailbox moves are rarely considered that critical.
In theory you could have as many migration endpoints as you would like. On the other hand, once you've migrated most of your mailboxes to Exchange Online, there is no need to keep them around (unless you plan to mass-migrate back to on-premises).
Additional migration endpoints aren't just handy for increasing throughput; they’re also great if you need to migrate mailboxes from various datacenters: one endpoint could live in one datacenter and another one in a datacenter somewhere halfway across the globe. Of course, this is only useful if you have Exchange servers in that location.
Although you could also use the Exchange Control Panel, adding a migration endpoint is fairly easy through PowerShell and gives most flexibility in my opinion. Once connected to Exchange Online, run the following cmdlet:
New-MigrationEndpoint -Name <name> -RemoteServer <FQDN> -ExchangeRemoteMove -Credentials (Get-Credentials)
If you would like, you can also specify MaxConcurrentMigrations and MaxConcurrentIncrementalSyncs as optional parameters. If not, they will be created with default values as explained in Part 1 of this series.
Once you have configured multiple endpoints, don't forget to point each new migration batch to a different endpoint. If necessary, you can also tweak the settings per endpoint to accommodate for differences in your infrastructure. For instance, if you have a faster internet connection in one datacenter, your might want to increase the MaxConcurrentMigrations beyond what is configured for endpoints in another datacenter.
Enterprises often worry about exposing the Exchange Web Services to the internet. Although the incoming connection is secure, there are a few things you can do to satisfy a distrustful security officer.
Are these the only things I can do? No. You could enable IPS, additional DDOS-protection features etc. But as discussed in Part 1: all these can (and will) hamper your migration throughput.
That's it for this part. In part 3 of this series, we will look at some common issues with migration endpoints, but also what to do to calculate and troubleshoot your migration throughput.


In Part 1 of this blog series, we went through the topics of how to discover identities, workloads,...