
Migrating Distribution Lists to Office 365 Groups

Office 365 Groups (that’s Groups with a capital “G”) are a newish feature of Office 365 that allow...

There are a few compelling reasons to move to Office 365, and in my opinion, Office 365 Groups are at or near the top of that list. Office 365 Groups combine resources from across Office 365 in ways that are not possible on-premises to give end users interesting new functionality.
Originally, Microsoft envisioned Office 365 Groups as resources that did not need much, if anything, in the way of administrative control. The idea was that end users should be able to control their collaborative experience without pesky admins getting in their way. This, of course, is a ridiculous concept that Microsoft has since corrected. Now Office 365 administrators have the controls necessary to ensure Groups are being used in accordance with organizational data usage policies within their Office 365 tenants.
In this blog post, I’m going to outline the management controls available for Office 365 Groups via PowerShell. There are other, more GUI-based ways to accomplish most of the tasks I am going to cover in this post, but I try to be PowerShell-first in my administration, so that's what I’ll focus on here.
It’s important to note that Office 365 Groups exist across Azure Active Directory, Exchange Online and SharePoint Online, so our management needs to take place in different PowerShell sessions.
Microsoft’s original vision for Office 365 Groups was that any user should be able to create any Group at any time for any reason without being hassled by “The Man.” Turns out there are reasons IT departments exist, and one of those reasons is to govern the use of IT resources. When users are left to decide how resources should be used, an organization can end up with a giant mess that is useful for no one.
Here’s the first way you can control who has permissions to create new Office 365 Groups within your tenant.
Completely disable the creation of new Office 365 Groups in your tenant
To Disable Group creation for a subset of users
Organizations will sometimes prefer that Groups adhere to a specific naming policy. Usually this will take the form of a specific prefix being added to the Group name, but it can also include a suffix. The prefix is generally preferred because that will cause all Groups to show up together in the GAL. You can also specify a blocked words list that will prevent specified words from being used in the names of Groups.
In the fairly near future, Microsoft will release their own “blocked words list” that will contain all sorts of offensive words. For now, you have to know any words you don’t want used in Groups names and enter them with the following procedure.
Check existing Group name policy and blocked words list
Set Group name policy and blocked words list
The use of <> is a little confusing in this command. <GroupName> in the naming policy refers to the AD property and must be entered exactly as I have done there. <blocked words> should be replaced with the comma-separated list of words you want to block.
When in the course of human events it becomes necessary for people to send emails from an Office 365 Group alias name, the following procedure will allow them to assume the powers to which the Laws of Nature entitle them.
Once these commands are run, the user specified in step 3 will be able to choose the Group in the From field of Outlook or OWA. The user will also need to add the Group to the CC field to ensure the Group itself receives a copy of the message.
In an attempt to embiggen (note to editor: that word is perfectly cromulent) myself, I also like to think about the SharePoint aspects of Groups. As such, I’ve discovered you can manage the storage quota for Office 365 Groups like this:
Running the Get-SPOSite cmdlet from step 2 after will verify that the quota has been set to your specifications.
Additionally, you can see a number of other parameters you can control with the Set-SPOSite cmdlet. I’m not completely sure what they all do, but I’ll be sure to play with them some and see what breaks!
As a reminder, I previously wrote a blog post in this space detailing the process of migrating distribution lists to Office 365 Groups. That blog post can be found here.
The cloud is ever moving forward, and the PowerShell controls for Groups demonstrate this as well as anything. Microsoft is currently in the process of implementing settings templates into Azure Active Directory that will allow additional control over how Groups work in your tenant. The new controls available are listed below.
The usage guidelines URL is just a URL that will appear on your Group’s control panel screen in OWA. You can use this in conjunction with the classification list to help inform your user community about your organization's data usage policy. At this time, there is no enforcement included in this control, but I can imagine an integration with the new Azure Information Protection at some point that will take action based on the Groups classification.
The ability to control Group creation is already present in Office 365 via OwaMailboxPolicy (as outlined above), but this method allows you to designate that a security group is allowed to create Groups. This way will be easier to manage long term, I suppose.
Before you can do these tasks, you need to install the correct version of the Azure AD Module for PowerShell. The cmdlets you’ll need are in the preview version (1.1.130.0) located at THIS SITE. That is current as of 10/6/16. If you are reading this in the future, you may need to check your version of AAD module for PowerShell to ensure you have the cmdlets I am calling below. You can use the Get-Command PowerShell cmdlet to verify the cmdlets you need are present in your PowerShell module.
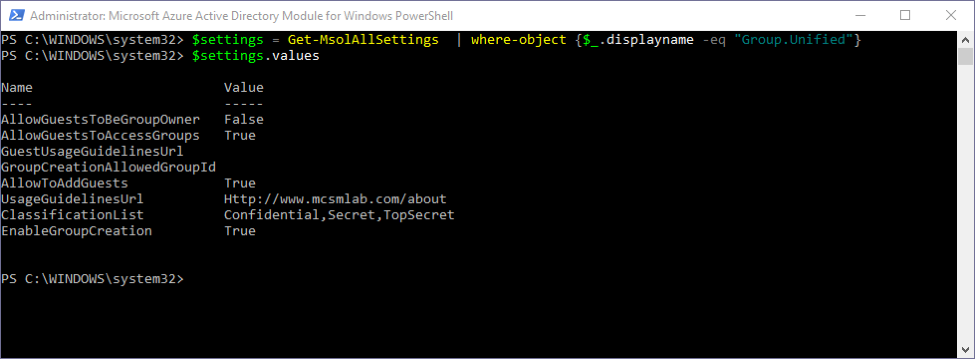
To see the current values of your Group template in Azure AD
Here is the output I get in my tenant

You can see I have a classification list set as well as usage guidelines URL, but all other settings are the defaults.
To modify these settings
With step 3 and 4, you can change the value to whichever you’d like to modify.
Here is a screenshot of the edit screen for a Group in my tenant after making those settings.
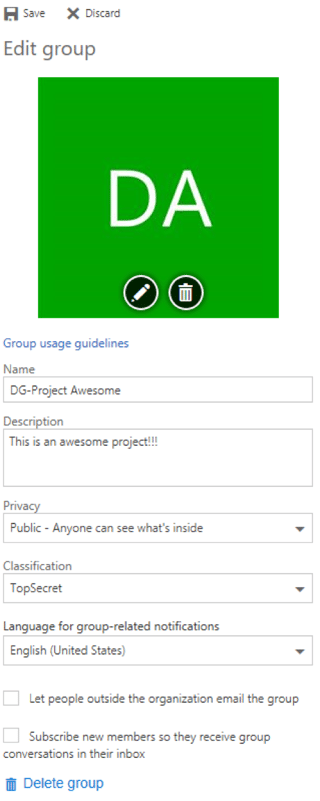
You can see the hyperlink to “Group usage guidelines” under the picture and the new pull down for “Classification.”
In my testing I ran into some issues. I was sometimes able to change values, but sometimes I would get errors as shown below.
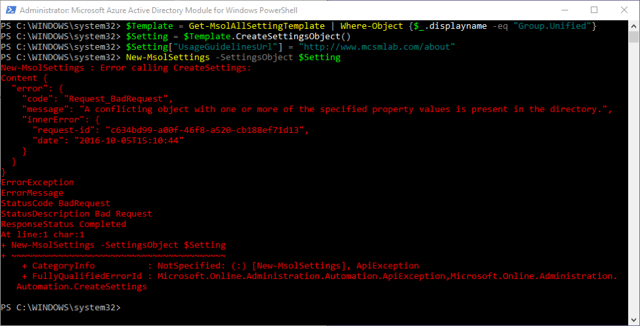
When I started getting this error I had to clear my template back to default and start over.
To clear your MSOL Settings Template
Once that was done, I was able to proceed with modifying the template as expected.
Eventually Vasil, who also writes smart stuff in this space, pointed out that if you have existing settings in your template you need to use the Set-MsolSettings cmdlet in step 5 above — not the New-MsolSettings cmdlet. These PowerShell commands are way more complicated than they need to be. Hopefully these PowerShell commands will be simplified a bit as this process evolves.
As you can see, administrative control for Office 365 Groups has come a long way since they were introduced. I didn’t much care for the solution originally envisioned by Microsoft, but with these controls, Groups is quickly turning into a very strong selling point for Office 365.
If there are any additional controls you’d like to see implemented in Office 365 Groups, let me know. I’m sure Microsoft would appreciate the feedback.