Top 3 Challenges When Considering an Exchange Hybrid Deployment

“Cut-over” . . . . Even the word itself sounds abrupt. The pressure of preparing all your data,...


In an earlier blog post I wrote about Autodiscover changes, especially when using Outlook 2016 Click-to-Run.
Traditionally, Outlook uses the following order to find its configuration in an Exchange environment:
Whether you are using domain joined clients or not, Outlook always uses this order in its Autodiscover process. It always starts with checking the Service Connection Point in Active Directory (for domain joined clients), and if it cannot find any (when not connected to the internal Active Directory or when using a non-domain joined client) it continues with the next step. Again, if it cannot find any information in the next step it continues with the next step, and the next step, and the next step and so on.
As you can see, there are several dependencies. How do you know which route your Outlook client is using?
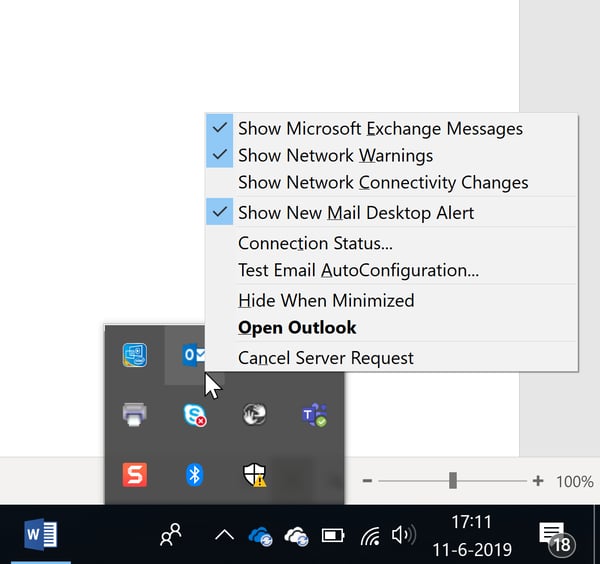
There are two somewhat hidden options in Outlook that you need to know. In the system tray in the lower left bottom of your display there’s an Outlook icon, if your press CTRL-Right Click on this Outlook icon there are two options, Connection Status and Test E-mail Autoconfiguration as shown in the following screenshot, taken when using Outlook 2016:
When you click on Connection Status, you’ll see the number of connections your Outlook client has open against the Exchange server. In this example, I have an Outlook 2013 client against an Exchange 2016 server with only mailbox and an online archive:
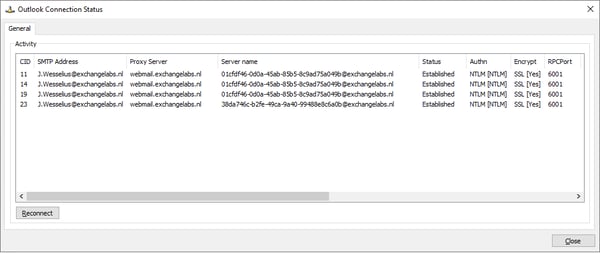 Figure 2. Check connection status in Outlook 2013
This option is very useful to verify where your Outlook clients connects to, or in case it won’t connect to check where it fails.
The second check is Check E-mail AutoConfiguration and this option is used to verify the Autodiscover process in your Outlook client. If you chose this, you can enter your email address and password (uncheck the Use Guessmart and Secure Guessmart Authentication options) and click Test and you’ll see something similar to the following screenshot:
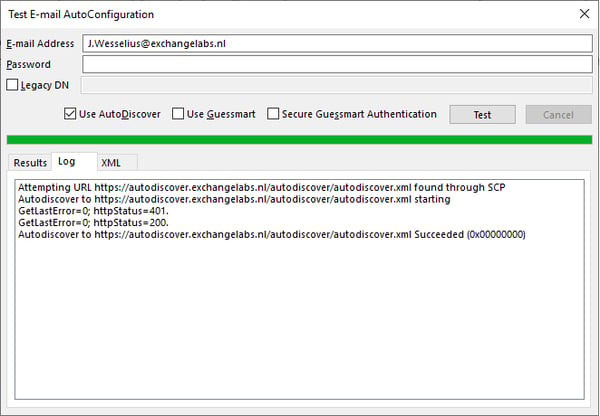 Figure 3. Test E-mail Autoconfiguration for a domain joined Outlook 2013 client
As you can see it finds the correct URL in the Service Connection Point (SCP) and connect to the URL accordingly. It only takes a few seconds before the right configuration is returned by the Exchange server.
If we do the same, but for a non domain joined client we see something different. Since it is not connected to Active Directory it does not check the SCP, but it continues the list as outlined in the beginning of this article. It starts querying the root domain, but this fails. Then it starts querying the autodiscover FQDN, and it succeeds as shown in the following screenshot:
 Figure 4. Test E-mail Autoconfiguration for a non domain joined Outlook 2013 client
Clearly visible are the different steps, including a number of tries on the Autodiscover URL. This fails a couple of times because of anonymous access, and it succeeds when credentials are entered. Then it returns the correct information.
It becomes annoying when trying with a non-domain joined Outlook client where the mailbox is in Office 365 (hybrid environment). Again it takes all steps as listed in the beginning of this article, it can access the Autodiscover URL successfully, but finds a reference to Exchange Online (the target address, which equals the remote routing address) and continues all autodiscover steps against Exchange Online as shown in the following screenshot:
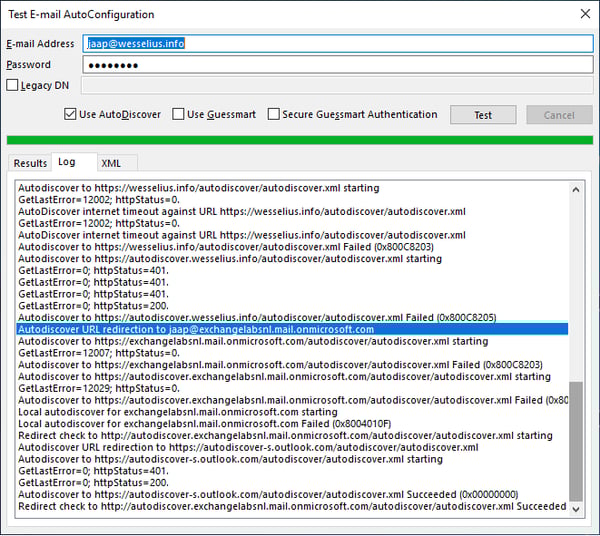 Figure 5. Test E-mail Autoconfiguration for a non domain joined Outlook 2013 client in a hybrid environment.
These tests are all performed on your Outlook client on your location. It can also be useful to test this remotely you can see how clients will behave when they are connected to the Internet on a remote location. You can use the Remote Connectivity Analyzer (RCA) to do this. You can find the RCA here. On the Exchange server tab select the Outlook Autodiscover radio button and click Next. Enter your credentials, check the two check-boxes, enter the verification code and click Next. RCA will now perform an Autodiscover test based on the email address you’ve used.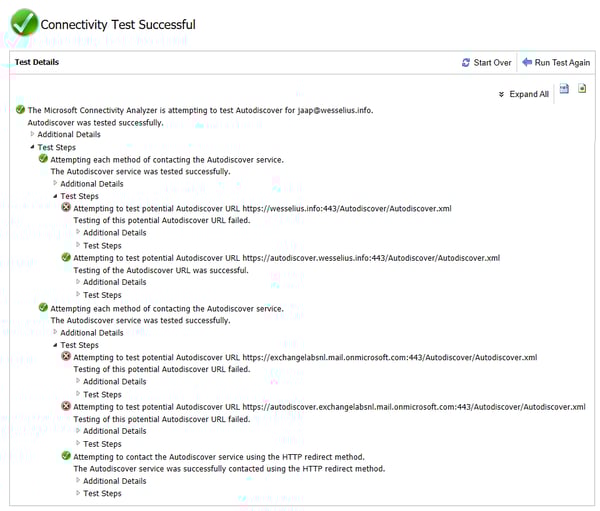 Figure 6. Autodiscover information from an external point of view.As you can see, Autodiscover can be a lengthy process and therefore it can take quite some time before the information that Outlook needs is returned. It is possible to change the Autodiscover process using registry keys on the Windows client where Outlook is running. You can find it here (or create this key if it doesn’t exist):
HKEY_CURRENT_USER\Software\Microsoft\Office\<version>\Outlook\AutoDiscover
Note: <version> can be 16.0 for Outlook 2016, 15.0 for Outlook 2013 and 14.0 for Outlook 2010.
The following DWORD entries can be created:
So, if you want to exclude the SCP and Root Domain check, you can add these DWORDS as shown in the following figure:
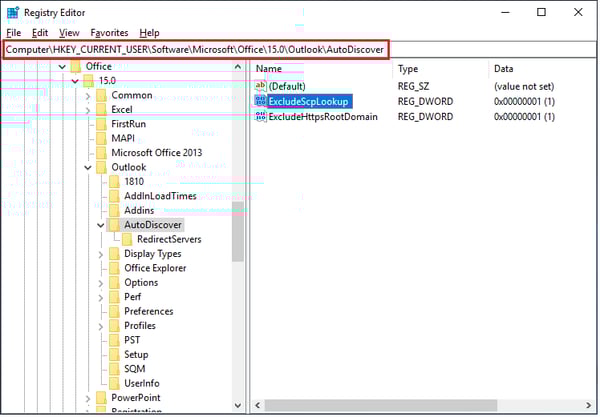 Figure 7. Exclude SCP and Root Domain check in Autodiscover
Now when running the Test E-Mail Autoconfiguration option in your Outlook client you’ll see that it is much faster than before:
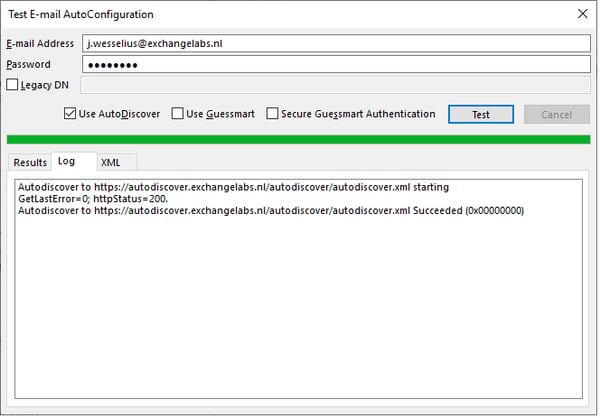 Figure 8. Using the registry keys, Outlook Autodiscover is much faster.
 You can play around with these registry keys and see what’s the best solution in your environment with your clients.
Now what was the deal with Outlook 2016 (Click 2 Run) that’s part of Office 365? In this version, Microsoft has changed the order in which Autodiscover checks the various options. Instead of using the SCP, the Root Domain and the Autodiscover domain, Outlook 2016 C2R does an initial check in Exchange Online, to see if this mailbox exists in the cloud. And if it does, it will automatically return the correct information instantly. It doesn’t make sense if you do not use Exchange Online, but Microsoft assumes that customers who are using Outlook 2016 also use Exchange Online.
Autodiscover in Outlook has been around since Exchange and Outlook 2007 and has been well developed since then. It works fine, and when using Exchange 2016 or higher or Exchange Online it is the only way of configuration for your Outlook clients. Old solutions like working with .PRF files or configuring an Outlook profile manually don’t work at all anymore.
Because of the various steps that Autodiscover follows, it can become a lengthy process. Using the Outlook registry keys you can select which options should be used by Autodiscover, therefore reducing the amount of time needed for the information to be returned.
Play with it and see what’s the best solution for your environment.
On-premises components, such as AD FS, PTA, and Exchange Hybrid are critical for Office 365 end user experience. In addition, something as trivial as expiring Exchange or AD FS certificates can certainly lead to unexpected outages By proactively monitoring hybrid components, ENow gives you early warnings where hybrid components are reaching a critical state, or even for an upcoming expiring certificate. Knowing immediately when a problem happens, where the fault lies, and why the issue has occurred, ensures that any outages are detected and solved as quickly as possible.
Access your free 14-day trial of ENow’s Exchange Hybrid and Office 365 Monitoring and Reporting today!