Configuring an Exchange Hybrid Deployment with Office 365 Part 1: AD FS Preparation and Installation

To configure an Exchange Server 2013 hybrid deployment with Office 365 you need to have Active...


As more and more organizations move to Office 365 the challenge shifts from “How do we get into Office 365?” to “How do we manage our data within Office 365?” Keeping your organization’s data secure inside the service is a major concern for many organizations, as well as for Microsoft itself.
To that end, Microsoft has put a lot of work into new features in both Office 365 and Azure that can help organizations better secure their data. One of those features is Privileged Identity Management (PIM). PIM is a feature that allows Just in Time administrative rights to be assigned to Office 365 accounts. This means that it is no longer necessary to maintain accounts with administrator privileges always assigned. With PIM your organization can setup accounts for your Office 365 administrators that do not have administrative rights until they are needed. When an administrator in your organization needs to make changes within the service, they can request elevation of their account though an automated process.
PIM roles are normally activated though the Azure portal. While I wouldn’t say this process is cumbersome, especially if compared to the process of assigning and revoking normal admin privileges, I wanted to find a way to streamline the process a bit. Something a little quicker that doesn’t require launching a browser and navigating GUI menus would make me happy.
Turns out the good folks at Microsoft seem to agree so they created a PowerShell module that allows us to activate PIM roles. This PowerShell module does not give us full PIM management yet but activating PIM roles with it does make life a bit easier. In this blog post I’ll show you how I wrote a PowerShell script using this PIM module to activate PIM roles for my Office 365 account.
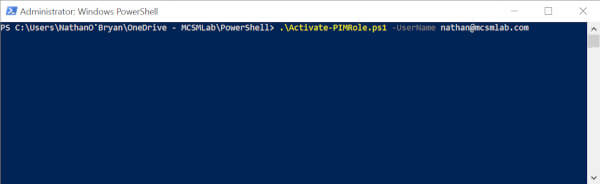
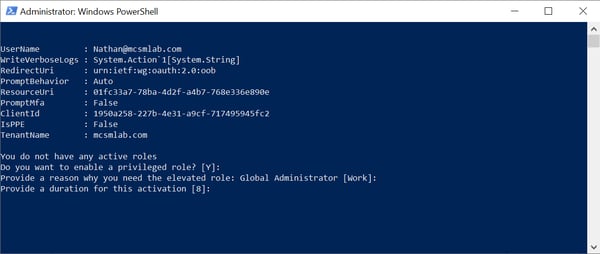
Once you have downloaded my script run it from with a normal PowerShell window. The first thing you’ll see is that there is a required parameter for UserName. I built the script this way because I often work in customer tenants, and I didn’t want to hard code the script to a single Office 365 account. Run the script as shown in the screenshot below.
The first thing the script does is check for the PIM PowerShell module installed on the local computer. If this module is not installed, and if the script is run in an Admin PowerShell session, it will install the module for you. If it cannot install the PIM PowerShell module, it will exit.
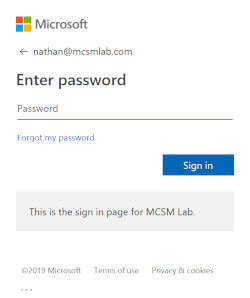
The script will ask you to authenticate with the account you put in the UserName parameter.
The script will also respect multi-factor authentication rules you have configured in your tenant.

I have setup Conditional Access in my tenant so that any authentication by accounts with Admin rights will require MFA. As the script runs through the process of activating PIM roles, it will require a second authentication. I have not yet found an acceptable way around this without storing the credentials, but if you have an idea feel free to submit the code to the project on GitHub.
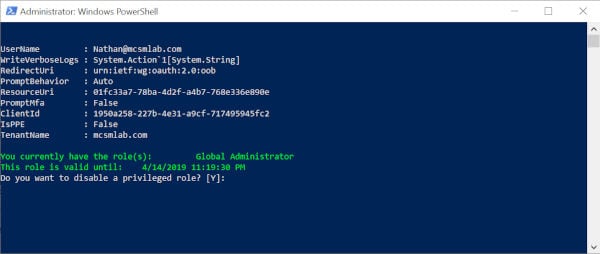
Next the script will connect you to the PIM service and check for any active PIM roles assigned to your account. If you currently have an active PIM role assigned, the script will ask you if you want to disable that role as shown below.
The default answer for any questions the script asks is always presented in brackets []. You can just hit enter to accept the default.
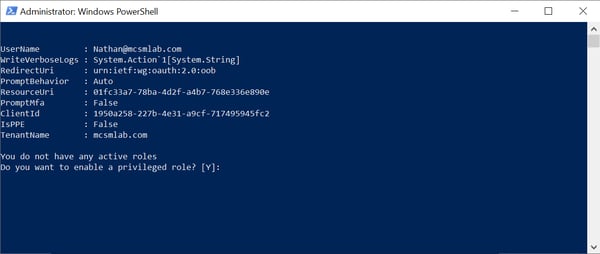
Running the script without an active PIM role will ask you if you want to active a role.
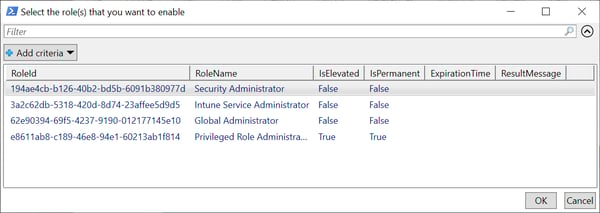
Next the script will show you the available PIM roles for your account and ask you to choose what to activate. You can choose multiple roles here if that’s what you need.
It will next ask you to enter a reason for the role activate and the duration. Both of these questions have default answers in brackets.
There is a section at the top of the script that defines all the default answers, so you can change them yourself if needed
#Default answers
$DisableRoleDefault = 'Y'
$EnableRoleDefault = 'Y'
$ReasonDefault = 'Work'
$DurationDefault = '8'
After you make all your selections, the script will activate your roles, and show you the duration your roles will be active. The time given will be in your local time zone.
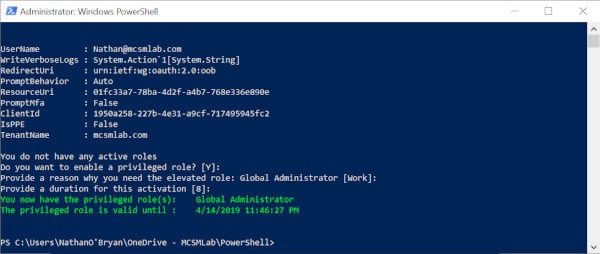
…and now your PIM role is active, and you can go about your administrative duties.
If you’re a PowerShell scripter, or interested in becoming one, I’ll add a bit of information about some of the choices I made in this script for your edification. I don’t claim to be a PowerShell guru, so feel free to play with the script and make whatever modifications work best for you. The script is on GitHub, any contributions to the project would be appreciated.
At the top of the script is a section contained within <# #>. This section serves two purposes.
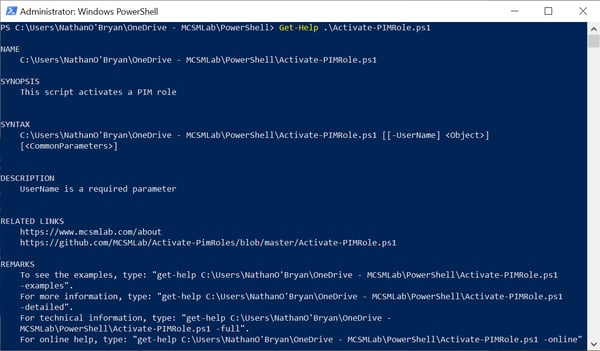
First it gives you some basic information about the script. Second, putting this information here in this format will automatically build Get-Help information for a script.
Running Get-Help against this script shows the following information.
The other bit of niftiness I’d like to point out here is how the role activation time is displayed. The PIM PowerShell module will only output these times in Zulu time (GMT). Getting the script to show the time in the local time zone turned out to be a difficult nut to crack.
Turns out that time is just output as a string, so the only way I know of to correct it for the time zone of the computer running the script is with some magic. I had to call in an assist to get this worked out. If you have a more elegant solution, please submit it to the GitHub project. Until someone comes up with something better, here is what we’re going with.
$CurrentRoles = Get-PrivilegedRoleAssignment | Where-Object { ($_.expirationtime) } | Select-Object RoleName,ExpirationTime,RoleID | ForEach {$BaseTime = $_.ExpirationTime;$SplitTime = $BaseTime.split(' ');$NewTime = $SplitTime[0]+' '+$SplitTime[1]+' '+$SplitTime[2];$RealTime = [datetime]$NewTime;$NewRealTime = $RealTime.AddHours($TimeOffSetUTC);$PartOne = $NewRealTime.ToShortDateString();$PartTwo = $NewRealTime.ToLongTimeString();$AllTime = $PartOne+' '+$PartTwo;$_.ExpirationTime = $AllTime;Return $_}
Hopefully this script will be a more convenient way for you to activate PIM roles. If you have anything to contribute, please do so. The script is on GitHub for just that purpose.
https://github.com/MCSMLab/Activate-PimRoles/blob/master/Activate-PIMRole.ps1
Proactively monitor AD FS from the end-users perspective with ENow's industry-leading monitoring platform. ENow monitors all of your AD FS servers and performs synthetic transactions, including performing a Single-Sign-On against Office 365 from inside your organization and outside (remote tests).