Exchange Monitoring: Exchange 2013 Back Up Monitoring

Microsoft Exchange Server 2013 has a very different server role architecture than its previous...


As an Exchange administrator, backup and recovery of your databases is an important aspect of your environment. There should be defined and streamlined processes in place for your environment as it relates to this topic. Why is this important? You may have an end-user that cannot find that very important message they received a couple of weeks ago or the data may be important for that legal investigation that unexpectedly came up.
What is the best way to approach backup and recovery of Exchange 2010? Well, there is not a one size fits all for every situation, but there are ways to recover data without doing Brick-level or granular level backups. Granular level backups can cost more from both a disk and software perspective, so it is important to explore other methods that can just as easily allow you to recover your user’s data.
Deleted Item Retention as a First Line of Defense
With proper Exchange 2010 setup and disk space sizing you can allow your users or Exchange Administrators the ability to simply recover that missing email from Outlook Deleted Item Retention for the mailbox in question. This method is really the fastest way for a user to get that email message that they didn’t mean to delete. The user or Exchange administrator can do this right from Outlook by going to Recover Deleted Items, selecting the message and choosing recover.

Before you implement however, consider that there is a recovery issue as it relates to Outlook Web App, Deleted Item Retention, and Macintosh. The issue is that when email is accessed from Outlook Web App on a Macintosh and the regular deleted items is emptied; your users will inadvertently remove all the items in their deleted item retention. This is an important consideration when deciding if this will be your first line of recovery defense. If your environment relies on Outlook Web App and Macintosh, then this option may not be a good fit for your organization.
If you determine that you will use deleted item retention, use the following steps on each Exchange database to set this up. Again make sure you have done proper disk sizing activities before making these changes.
1) Open Exchange Management Console
2) Expand Organization Configuration and expand Mailbox
3) In the middle of your screen under Database Management, right-click on a database and choose properties
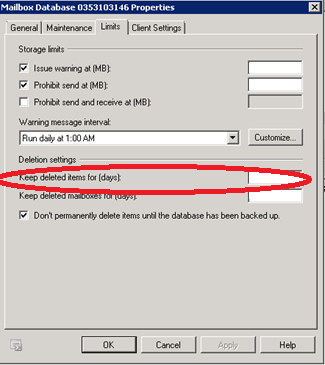
4) Choose the Limits tab and then set the “Keep deleted items for (days):” For example, 60 days and then click OK
These are the beginning steps needed to take in order to quickly restore an item. You may still find that you will have the occasional user that finds this option and dumps these messages, but 99% of the time the messages will be there and this will work well for your environment.
Use Exchange Database Backups as your Second Line of Defense
It is important to have a third party product for Exchange server backups so that you can recovery a database for any situation. You can also use your Exchange Database backups for mailbox level or item level recovery when Deleted Item Retention does not get your users the information they need. In Exchange 2010 you would use a recovery database.
Design and Backup Tips:
When you design your Exchange environment, be sure to plan for disk space that will be reserved specifically for database recoveries. This reserved disk should be 2 – 3 times your anticipated database size and exist on one of your exchange servers.
Make sure your third party backup program is also able to do redirected database restores. This should be a standard feature, but if the vendor cannot do this, then each of your exchange servers will have to have disk reserved for restores.
Plan for and complete nightly full backups of your Exchange databases.
Create a mailbox dedicated to restoring user data into.
Ready to Restore
1. Logon to the Exchange server you where the recovery will occur
Note: The article assumes that the R: drive is the reserved disk for restores.
2. Open Exchange Management Shell
3. Create a Recovery Database by typing New-MailboxDatabase -Recovery -Name "RecoveryDatabase" -server FillinServerName -EdbFilePath "R:\restore\recoverydatabase.edb" -LogFolderPath "R:\restore” press enter
4. Type Get-MailboxDatabase to verify that the RecoveryDatabase was created
Note: Recovery will automatically be set to true.
5. Initiate the restore per your backup vendor’s recommendations for recovering to an Exchange Recovery Database
6. Upon completion of successful restore open Exchange Management Shell
7. Type Mount-Database RecoveryDatabase
Note: Step 7 is only required if your backup vendor doesn’t automatically mount the database.
8. Open Exchange Management Console and under Server Configuration and Mailbox verify that the database is mounted successfully
Note: If it didn’t mount then there was an issue with the restore and you will need to remove the recovery database per the section below that describes how to remove a Recovery Database. Once removed, the recovery can be attempted again.
9. In Exchange Management Shell type Get-mailboxstatistics –Database recoverydatabase >c:\recoverydata.csv
Note: This will allow you to verify that the mailbox you are expecting to recover the data for exists.
10. Open recoverydata.csv and find the name of the user whose mailbox you are restoring. Make a note of the name exactly as it appears in the file
11. Type Restore-Mailbox -Identity emptyrestoremailboxname -RecoveryDatabase RecoveryDatabase -RecoveryMailbox "Lastname, Firstname" -targetfolder"nameofrestoredmailbox"
12. When prompted Y and press enter
13. When the restore is complete you will get a summary output to your screen and it will validate that the data has been restored
14. Open the RestoreMailbox to evaluate the data
15. From here the data can be exported to a .pst file and then provided to the user or an Exchange Administrator can copy the data directly to the user’s production mailbox
Removing the Recovery Database
When the recovered database is no longer required it is best practice to remove the recovery database. Typically this should be done within a day or two of the restore if it cannot be done immediately.
Open Exchange Management Shell
Type Remove-MailboxDatabase -Identity RecoveryDatabase, type Y and then press enter
Verify that it has completed removing from within the Exchange Management Console and by using Exchange Powershell command Get-MailboxDatabase
Browse to the Exchange servers R: drive and delete the restore folder from there
Hopefully this article has provided you some ideas on how to approach Exchange database backup and recovery in your environment. In most cases it is not necessary to do Brick Level or Granular Level Exchange backups to recover information quickly and efficiently for your users.
If you you found this article interesting, you may want to learn more about Mailscape's Disk Space and Backup monitoring features.
Disk Space Monitoring For Exchange Includes:
Backup Monitoring For Exchange Includes:
If you would like to speak with someone for more information or evaluate Mailscape via free trial let us know!