If you have ever been in a situation where you have lost a physical Exchange 2010 server from your DAG then this document is critical to your ability to recover this server. Examples of how this could occur are through OS corruption, accidental overwrite or a true datacenter disaster. Even if you haven’t been in this situation this article will provide the insight to what it takes to recover an Exchange server that had once been a beloved member of your Exchange 2010 DAG.
Just to set the stage, there are very specific steps to the recovery process beginning with a fresh server build. Before we can start building that new server there are some necessary steps to take and these are addressed next. Also, this document assumes that you are running Windows 2008 R2 and that you are recovering all Exchange server roles.
Before Getting Started:
- Verify that the server is truly failed. This can be done in several ways including creating a remote session to the failed server. However, when opening the Exchange Management Console from a server that is still functional references to the failed server will look similar to shown below.

- Double-check that all DNS entries for the failed server have been removed. If not, then these should be cleaned up. Examples of entries to look for would be autodiscover.chw.org or other DNS round robin aspects related to Exchange and the server that has failed in addition to the basic DNS records for the server.
- Verify that the server has been removed from load balancing aspects of Exchange. Typically this would be a 3rd party appliance. An example of potentially load-balanced aspects of Exchange would be the CAS array or relay.
Begin the Recovery:
- Rebuild your server with the same operating system and service pack as the original server. For example, Windows 2008 R2 Enterprise with Service Pack 1.
Note: In my experience it is ok to also apply the latest Windows Updates.
- Prior to adding the server to the domain go to Active Directory and reset the computer account. This can be done per the instructions in the this TechNet article on resetting a computer account.
Note: After step 1 and 2 we will set aside this freshly built server to remove the old DAG member from the Exchange organization.
- Login to one of the functional DAG members and open the Exchange Management Shell to remove your database copies for the failed server and the following warning is expected due to the fact that the failed server is no longer functional. Type Remove-MailboxDatabaseCopy DBName\ServerName
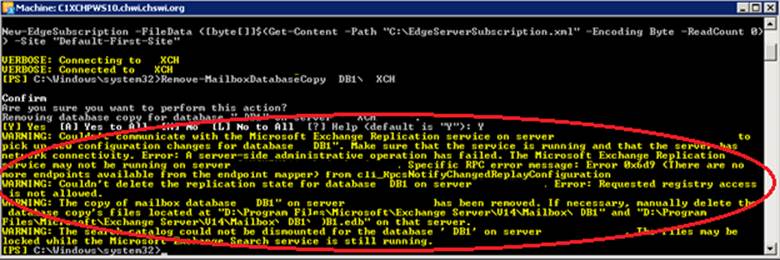
Note: If there were multiple database copies then this command will need to be run for each database copy that existed.
- Remove the database and log files for the databases copies that you deleted in step 4. This is a manual step that will be done by browsing to the location where the database and log files previously existed.
Note: Repeat these steps for each database that used to reside on this server.
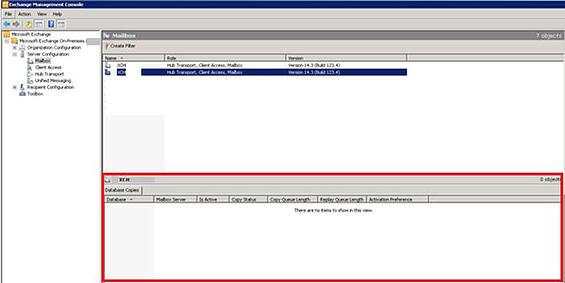
- Open the Exchange Management Console, expand Server Configuration and then click on Mailbox. From there, verify that all database references for the server have been removed as shown below.
Remove the Server from the DAG
- Now that the database copies have been removed, we can move forward with removing the failed server from the DAG by opening the Exchange Management Console
- Choose Organization Configuration on the left and then Mailbox
- Choose the Database Availability Group Tab
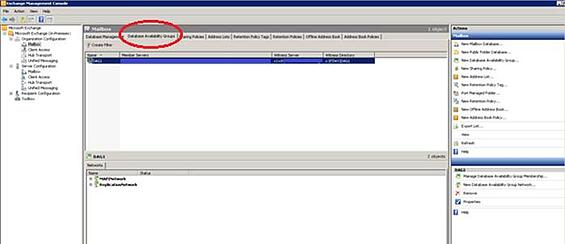
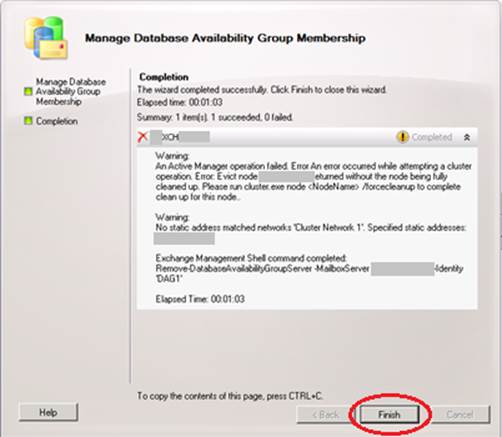
- Select the Database Availability Group and choose Manage Database Availability Group Membership

- Select the Server that needs to be removed from the DAG and click the red X to delete.

- Then click the Manage button
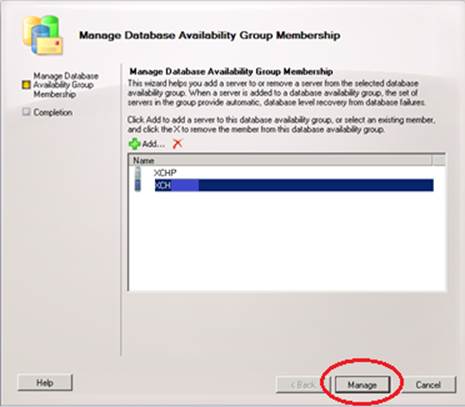
- The following warning is likely because the node doesn’t exist and it couldn’t evict from the cluster properly. Click Finish and we will address this next through steps 13-16.
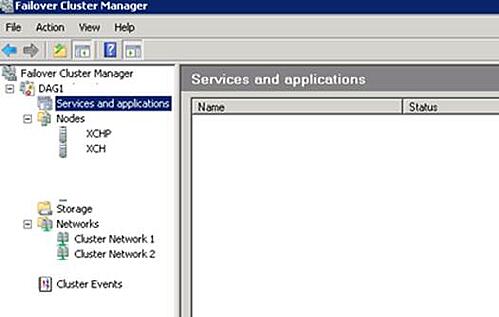
- Open Failover Cluster Manager on each of your Exchange servers to make sure that the failed server has been evicted from the node properly. If it has been properly evicted it will not show up in the list.
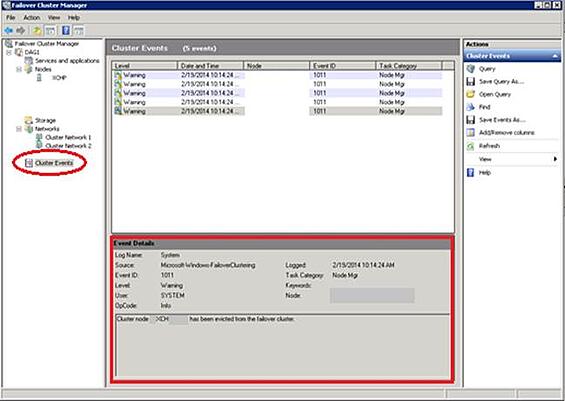
- The eviction will also be noted in the cluster Events.
- ***Only do step 16 if the server still exists in the cluster***
- Open a command prompt and run cluster.exe node servername /forcecleanup
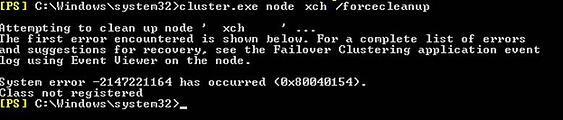
Note: The server will remove itself from the cluster even if the error above is received.
- In Exchange Management Console verify that the node is no longer in the DAG. This can be done by repeating steps 7, 8 and 9 above.
Install Exchange 2010 Prerequisites on the Rebuilt Server
- Install Exchange 2010 Prerequisites
http://technet.microsoft.com/en-us/library/bb691354(v=exchg.141).aspx
- Server Features to be added
- Add .net Framework 3.5.1 including HTTP Activation
- RPC over HTTP Proxy
- Install Failover Clustering for DAG
- Install AD DS tools
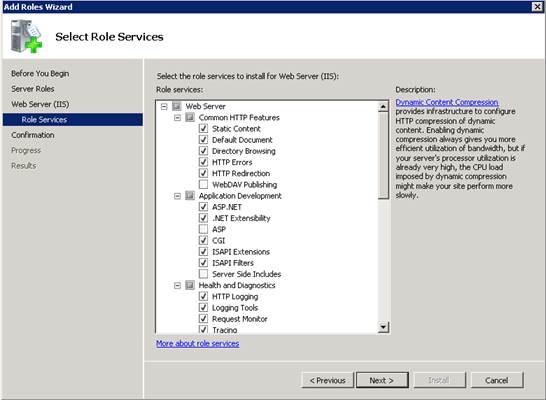
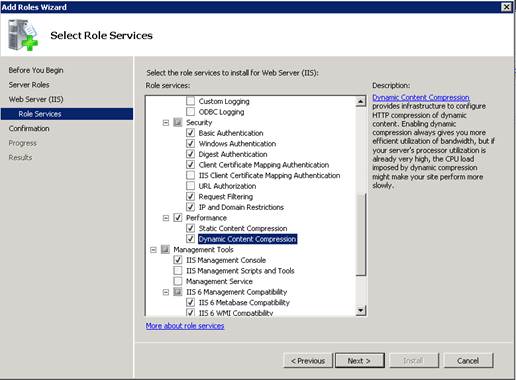
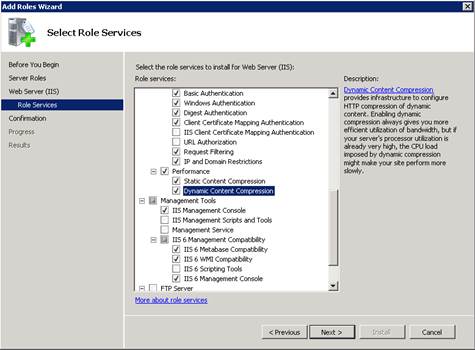
- Server Roles that should be installed as shown in the screen shots below
- Install KB2550886
- Download and install the Microsoft Office 2010 Filter Pack 2010 http://www.microsoft.com/en-us/download/details.aspx?id=17062
Check the Version of Exchange Installed within your DAG
It is very important that you are doing the recovery from the same version of Exchange that is installed across your Exchange environment. If you are not sure, you can check your other DAG members to find this information
- Open the Exchange Management Console
- On the left side of the screen click on Server Configuration
- The version of Exchange will be displayed; however, if the edition is missing then the column will need to be added.
- On the right side of the screen choose View, Add/Remove Columns
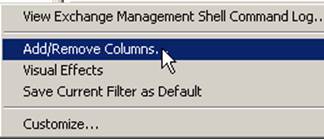
- Select Edition and Click add so that this moved to the right side of the columns
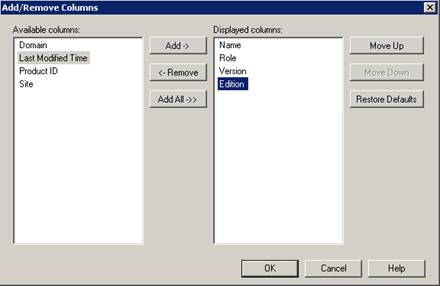
- Click Ok
- This will tell you if you are using Standard or Enterprise

- Check the Control Panel, Programs and Features to verify the Service Pack
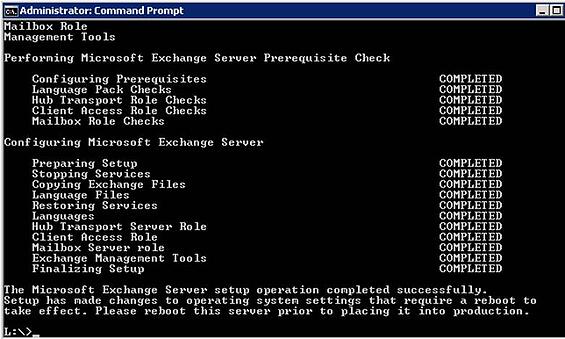
Install Exchange 2010 through the Recovery Command
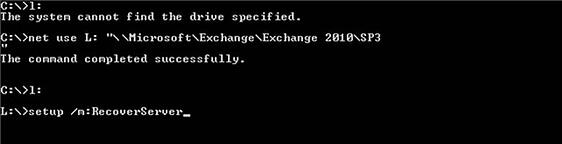
The following steps assume that your Exchange Server software is moved to a network share
- We are now ready to reinstall Exchange through the recovery command
- Open a command prompt
- Check to see if L drive is free, if not use a different drive letter
- Map a network drive with net use L: \\path\
- L:
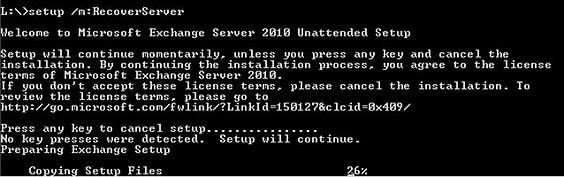
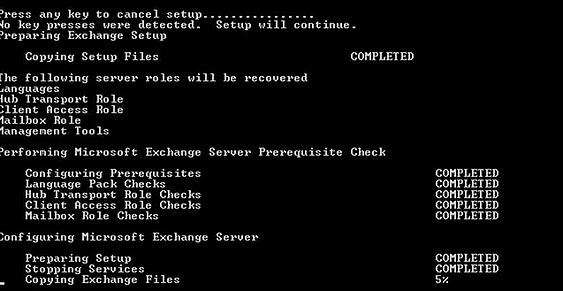
- Setup /m:RecoverServer
Configure the New Server
When reconfiguring the new server it will be important to check your environment against the other servers in your DAG. If possible it is always best to have these things well documented prior to any disaster. I do not recommend restoring any of the following settings from backup.
- Use Exchange Management Shell to add the rebuilt server back into the DAG by running
Add-DatabaseAvailabilityGroupServer -Identity DAG1 -MailboxServer servername
- Check all of your server settings to make sure that they match the other servers. For example, OWA settings for sites and permissions, Relay settings, POP and IMAP services if enabled and log file locations. These settings may or may not be relevant depending on the roles that are installed on the server and your organizational Exchange server design. For example, if this is not a CAS server then the OWA settings will not be relevant, etc.
- Create database copies for the databases that originally were housed on this server. This can be done through Exchange Management Shell using the following command.
Set-MailboxDatabaseCopy -identity ‘XDB1\c1xchpws11' -ActivationPreference 2
Note: The Activation preference for each database will vary depending your DAG design.
- Install any other 3rd party tools required on this server. For example, email antivirus, server antivirus, server monitoring etc.
- Install any required 3rd party certificates required for the Client Access Server Role. This certificate will be used for any Exchange features you access remotely such as Outlook Web App, Active Sync or Outlook Anywhere. The following article provides additional detail on Exchange and 3rd party certificates. http://technet.microsoft.com/en-us/library/bb310795(v=exchg.141).aspx
Bring the Exchange Server Back into Production
- Open Exchange Management Shell
- Go to c:\Program Files\Microsoft Exchange Server\v14\Scripts
- Type RedistributeActiveDatabases.ps1 –Dagname DAG1 –BalanceyDbsbyActivationPreference command to move the rebuilt server back into production
- Work with networking to add this server back to load balancing and your DNS administrator to verify this server is added back to autodiscover.chw.org
By having a well-designed plan for server recovery if a member of your Exchange 2010 DAG is failed is very important to a timely recovery. For additional detail, see the this TechNet Article on how to recover a DAG member server.