In early June, Microsoft released a new PowerShell module for managing Exchange Online to the public. This module was already announced at Ignite 2019, but it took some time for the module to go into preview end of last year before reaching Generally Available status.
Usage of this module promises substantial improvements over the existing methods to connect to Exchange Online using Powershell, such as:
- Leveraging the PowerShell module ecosystem to install and update the module. This as opposed to the click-to-run Microsoft Exchange Online Powershell Module or the standard PowerShell remoting option.
- Support for Multi-Factor Authentication. This is something which the click-to-run method already offered but was not available through remoting.
- Robustness. Existing sessions could easily timeout when you took a short break from the console, or worse, your script could terminate in the middle of execution. This required you to reconnect or forced you to add resilience to your scripts by dealing with these disconnects from the back end. The cmdlets of the EXOv2 module should be more robust and resilient.
- Introduction of the Graph API support, which should show improvements in terms of speed. Microsoft indicated an 4-8 times speed improvement should be achievable, but your mileage may vary depending on the operation.
- Support for PowerShell 6/7, core and non-Windows operating systems.
Exchange Online Management module
The module has been baptized EXOv2 to distinguish between this module and the click-to-run module. It is available in the
PowerShell Gallery, and installation is straightforward. Open a PowerShell 5.1 or later session in elevated mode and run:
Install-Module ExchangeOnlineManagement
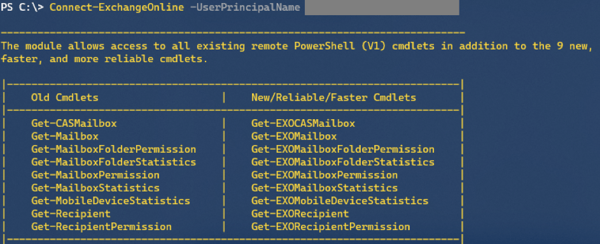
The EXOv2 cmdlets leveraging REST calls to Graph API have their nouns prefixed with ‘EXO’, e.g. Get-EXOMailbox. Currently, there are 9 EXO cmdlets in the GA module, as well as few additional ones (more on those later). The regular commands such get Get-Mailbox become available after connecting to Exchange Online, which is similar behavior to the EXOV1 module, e.g.
Connect-ExchangeOnline [-UserPrincipalName <UPN>]
When required, satisfy the Multi-Factor Authentication logon process, and you are done. Be advised that the EXOv2 module also supports
Delegated Access Permissions (DAP), allowing partners to connect to customer tenants. To accomplish this, specify
-DelegatedOrganization mycustomer.onmicrosoft.com when connecting.
Also note that apart from the EXO cmdlets, the current module also offers a few other interesting commands:
- Connect-IPPSSession to connect to Security & Compliance center or Exchange Online Protection, depending on licensing. This command was also available in EXOv1.
-
Get-UserBriefingConfig &
Set-UserBriefingConfig. These are a bit out of context, as these commands allow you to enable or disable the
Cortana Briefing for users.
- IsCloudShellEnvironment indicates if you are running from PowerShell or Azure Cloud Shell, which might be useful in scripts to determine the current context.
The EXOv2 cmdlets and their v1 equivalents are shown in the table below:
| EXO v1 or Remote PowerShell |
EXO v2 |
| Get-Mailbox |
Get-EXOMailbox |
| Get-MailboxFolderPermission |
Get-EXOMailboxFolderPermission |
| Get-CASMailbox |
Get-EXOCASMailbox |
| Get-MailboxFolderStatistics |
Get-EXOMailboxFolderStatistics |
| Get-MailboxPermission |
Get-EXOMailboxPermission |
| Get-MailboxDevice Statistics |
Get-EXOMobileDeviceStatistics |
| Get-Recipient |
Get-EXORecipient |
| Get-RecipientPermission |
Get-EXORecipientPermission |
What you might notice is the absence of any Set-EXO* cmdlets. This is true, and there is no word yet on when Set cmdlets will be introduced. That said, the biggest speed gain is often in bulk retrieval of data, not so much in altering one or more attributes. Until then, do not despair though, as you can pipe output of the EXO cmdlets to their regular cmdlet, e.g.
Get-EXOMailbox michel | Set-Mailbox -EmailAddresses @{Add=’michel@myexchangelabs.com’}
This will also provide the additional benefit of parallel processing of objects as they pass through the pipeline.
Now comes another thing you should be aware of, and that is that these EXOv2 cmdlets might not run the same parameter set as their v1 equivalent. Simply said, you cannot perform a simple Find and Replace operation in your script replacing Get-Mailbox with Get-EXOMailbox to start enjoying benefits of the new module.
When running a cmdlet like Get-EXOmailbox, you might notice that it returns only a subset of the attributes you might expect. Similar to what Properties does for Active Directory module, the EXOv2 module requires you to specify the individual Properties to return. Alternatively, you can use PropertySets to select a predefined set of attributes. For example, Get-EXOMailbox supports PropertySets such as All, Minimum (default), Delivery, Policy, Quota and Retention to name a few. When needed, you can combine PropertySets, so something like Get-EXOMailbox -Identity michel -PropertySets Quota,Policy is possible.
And now a small word on All. Just like Get-ADUser .. -Properties * is considered bad practice as you can impact resource usage and usually return more than what you need, using -PropertySets All for every call is also a bad idea. I am aware All is convenient, but make sure you only return the data you need. Be a good person.
To see which EXOv2 cmdlets support PropertySets, use:
(get-command -Noun EXO* -Module ExchangeOnlineManagement).Where{$_.Parameters.propertySets}
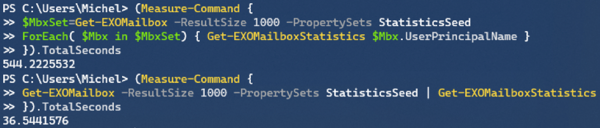
Now, suppose we want to get an indication of the performance enhancements by comparing EXOv2 and equivalent operation using v1 cmdlets, in this example returning quota information:
In this case, it is not the 4-8x improvement, but more than twice as fast is significant nonetheless, especially if you are waiting for the results. To see the impact of parallel processing in the pipeline, we run the following:
Note that the PropertySet StatisticsSeed is a very minimal set of attributes which you can use if you only wish the refer to the objects, such as userPrincipalName, primarySmtpAddress and externalDirectoryObjectID.
As indicated, there is a substantial increase in performance, but of course your mileage may vary depending on things like the number of objects, the attributes you require, and any filtering applied. Speaking of filtering, one would expect that server-side filtering (-Filter) would show an improvement in terms of speed over client-side filtering (Where), as filtering at the source is far more efficient in terms of result set and data to send over. However, it seems that due to the nature of a shared environment, sending superfluous data over the wire is less of a penalty than local filtering. Of course, your mileage may also vary here, so experiment what works best for your situation. Also, not every attribute is supported for filtering with these EXO cmdlets, which lies in the nature of how Graph exposes data. More information on that
here.
When your session times out or disconnects, you will see that the module tries to reconnect your session; something which you would have to programmatically solve for the v1 module or regular remote PowerShell:
Certificate-based Authentication
Exchange administrators often have a requirement to run unattended scripts against Exchange Online, for example scheduled reports or as part of another process. In the past, this lead to setups where service accounts and stored credentials were used. Later this was improved by the ability to apply Conditional Access to limit these logons to on-premises infrastructure. Now, the problem with Multi-Factor Authentication is that it requires interaction with end-user to approve the sign-on. Of course, while your token is still valid, you can easily (re)connect to Exchange Online just by providing the Username Principal Name, which will reuse the token if it didn’t expire. But all in all, these solutions are high maintenance, and far from ideal from a security perspective.
Here comes certificate-based authentication. A preview version of the EXOv2 module was released end of June, which offers certificate-based authentication. In short, certificate-based authentication allows you to log on to Exchange Online using PowerShell, the EXOv2 module, a (self-signed) certificate and an App registration in Azure Active Directory containing that certificate as well.
To install the EXOv2 preview module (v2.0.3 at time of writing), use:
install-module ExchangeOnlineManagement -AllowPrerelease
Note that it might complain if you have the GA version of the module installed, in which case you need to uninstall the GA module first, or you can install them side-by-side by specifying -Force.
Next, we need to create a self-signed certificate. To accomplish this, we can use the script published here. To create the certificate, simply use:
.\Create-SelfSignedCertificate.ps1 -CommonName 'EXOv2' -StartDate 7/30/2020 -EndDate 7/30/2021
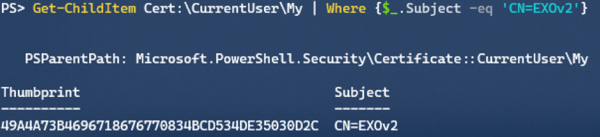
Note that you need to provide a password to protect the PFX file which contains the private key. Remember this Password, as you will need it when connecting to Exchange Online later on. Also, do not forget to import the PFX in your local certificate store. After importing, you can check for the certificate using:
Get-ChildItem Cert:\CurrentUser\My | Where {$_.Subject -eq ‘CN=EXOv2’}
The Subject should be the CommonName you used when generating the certificate. The thumbprint of our certificate is EA3DB6CCE976FD7FFC09560DA6659AB6D3E030FE.
Now we need to set things up in Azure Active Directory:
1) Open up the Azure Active Directory Portal, and navigate to Active Directory.
2) Select App registrations, and click New registration.
3) Give the App a meaningful Name, and select Accounts in this organizational directory only. Set Redirect URI to Web and leave the URL blank. Then, click Register.
Note that our App has been assigned an Application (Client) ID. Note this value down, as we will also need it to connect later on.
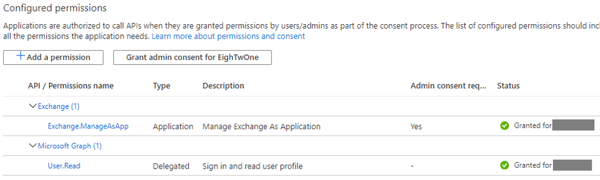
4) Next, we need to configure the App permissions. Select API permissions. User.Read should show up as default. Click Add a permission, and select Exchange (at the bottom). Select Application permissions, and in the next screen expand Exchange and check Exchange.ManageAsApp. We are done here, so click Add permissions. Only thing left now is to Grant admin consent, which can be done by clicking Grant admin consent for <tenant>. When done, the Status column for Exchange.ManageAsApp permission should have changed to Granted for <tenant>.
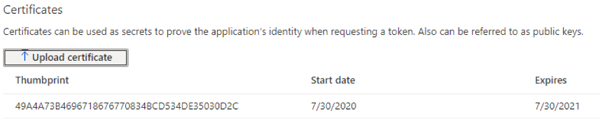
5) Now we need to associate this App without certificate. Select Certificates & Secrets and click upload certificate. Pick the certificate file which we generated earlier and select Add.
Last step is to assign the App one of the built-in Azure AD roles. Go to the Azure Active Directory blade and select Roles and administrators. Unfortunately, only the following built-in Azure AD roles are supported at this moment:
| Global Administrator |
Security Reader |
Security Administrator |
| Helpdesk administrator |
Compliance Administrator |
|
| Exchange Administrator |
Global Reader |
|
Select one of the roles and click add assignments in the assignments overview screen. Note that when picking security principals, the App might not show up in the initial list and typing its first few letters might help. Click Add to assign the role.

Note that the UserName mentioned in the overview is the Application ID.
Now we are done configuring the back end, we can look again at connecting. This should now be as simple as running:
Connect-ExchangeOnline -CertificateThumbprint ‘49A4A73B4696718676770834BCD534DE35030D2C' -AppId 0d3f8f4c-34fb-4a22-8466-80fd7379593b' -Organization <tenant>.onmicrosoft.com
Where thumbprint is, the thumbprint of the self-signed certificate you created earlier, AppID is the Application (Client) ID of the registered App, and tenant the initial onmicrosoft.com domain name of your tenant. Note that you can also connect specifying the CertificateFile instead of Thumbprint, but then you need to provide the password with CertificatePassword to decrypt the PFX file.
If all steps were followed correctly, you should now be connected to Exchange Online, without any MFA interaction.
Final Words
Few final words on EXOv2. Do note that it is a Preview module, so little things might not work. It would be nice if there would be a way to incorporate Exchange granular Role-Based Access Control model into the permissions model. Granting Apps only the built-in Azure AD roles is somewhat limiting, and it would be nice to restrict accounts in only being able to run the cmdlets and parameters they need to use. Also, the logon from the AppID is not registered in the Azure AD Sign-Ins. And finally, when running Exchange cmdlets, you will find these in the audit log but with the <tenant>\AppID as UserName. Therefore, how tempting it may be, best thing is to use a single App registration for a single administrator or process, and now use a single App registration to attach multiple certificates.
ENow for Office 365 Reporting
ENow's Office 365 solution has a wide variety of built in Office 365 reports ranging from: traffic, storage & usage, client access, app specific reports (Teams, OneDrive, etc), license adoption, license management, and more! These reports can easily be customized to meet your organizations needs.
Given the breadth of Office 365 and each organizations unique reporting needs, we realize it would be nearly impossible to make every report imaginable out of the box. With that said, we have built in PowerShell component with the ability to store your own reports directly to the console.